Difference between revisions of "Roster Templates"
| (20 intermediate revisions by the same user not shown) | |||
| Line 8: | Line 8: | ||
If you get stuck or have any questions, please don't hesitate to contact [https://wageloch.com.au/contact Wageloch Helpdesk]. | If you get stuck or have any questions, please don't hesitate to contact [https://wageloch.com.au/contact Wageloch Helpdesk]. | ||
=Creating a Template= | |||
* On the Roster home screen, click the Rosters drop menu in the top right. | * On the Roster home screen, click the Rosters drop menu in the top right. | ||
| Line 21: | Line 21: | ||
<br> | <br> | ||
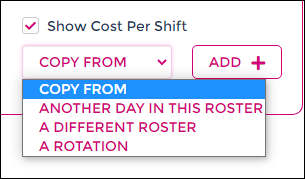
<b>HANDY TIP</b>: Use the Copy From menu in the bottom right to copy data from day to day, a previous roster, another template and more! | <b>HANDY TIP</b>: Use the Copy From menu in the bottom right to copy data from day to day, a previous roster, another template and more! | ||
<br><br> | |||
[[File:Roster-template-menu.png]] [[File:Template-create-menu.png|210px]] [[File:Blank-template.png]] | |||
<br> | |||
==Set Staff and Shifts== | |||
Thankfully this aspect of creating a template is identical to <b>[[Creating Rosters |basic roster creation]].</b> | Thankfully this aspect of creating a template is identical to <b>[[Creating Rosters |basic roster creation]].</b> | ||
| Line 32: | Line 36: | ||
* Click Save. | * Click Save. | ||
* Repeat for each day, or use the Copy From tool. | * Repeat for each day, or use the Copy From tool. | ||
<br> | |||
Be sure to click <b>Save</b> as you build! | Be sure to click <b>Save</b> as you build! | ||
<br><br> | |||
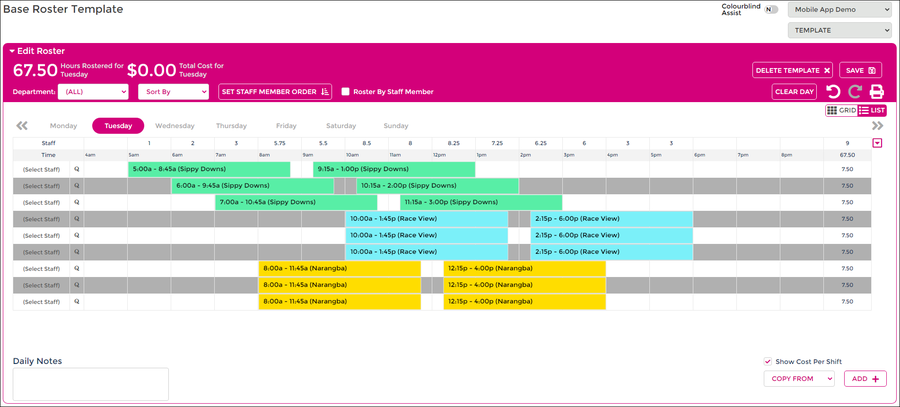
[[File:Template-setstaff.png|900px]] | |||
==Set Shifts with No Staff== | |||
This method of building is still very similar to [[Creating Rosters |basic roster creation]] but there is a slight variation. | This method of building is still very similar to [[Creating Rosters |basic roster creation]] but there is a slight variation. | ||
| Line 47: | Line 53: | ||
* Click Save for each day as you build. | * Click Save for each day as you build. | ||
<br> | <br> | ||
[[File:Template-nonames.png|900px]] | |||
==Set Staff/Shifts and Shifts with No Staff== | |||
This method is a hybrid of using [[Roster_Templates#Set_Staff_and_Shifts |set staff with shifts]] and [[Roster_Templates#Set_Shifts_with_No_Staff| set shifts with no names]]. | |||
Follow the steps above to add in staff with their set shifts, and shifts with no staff name to be allocated out during the roster creation phase. | |||
<Br><br> | |||
[[File:Template-hybrid.png|900px]] | |||
==Creating Roster from Template== | |||
* Open Wageloch and sign in | |||
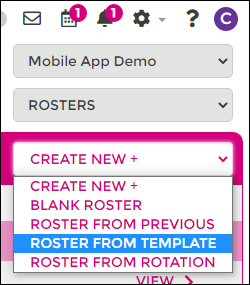
* On the Roster homescreen, click Create New+ and select From Template | |||
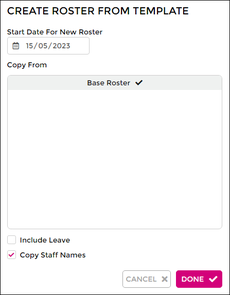
* The roster start date will align with your timesheet period and/or the end date of your previous roster. | |||
** Select the name of the template you wish to copy from. | |||
** Copy Staff Names to be ticked; brings names of staff in the template over. | |||
** Leave Copy Leave to remain unticked; only used in special circumstances. | |||
* Click Done to create your roster. | |||
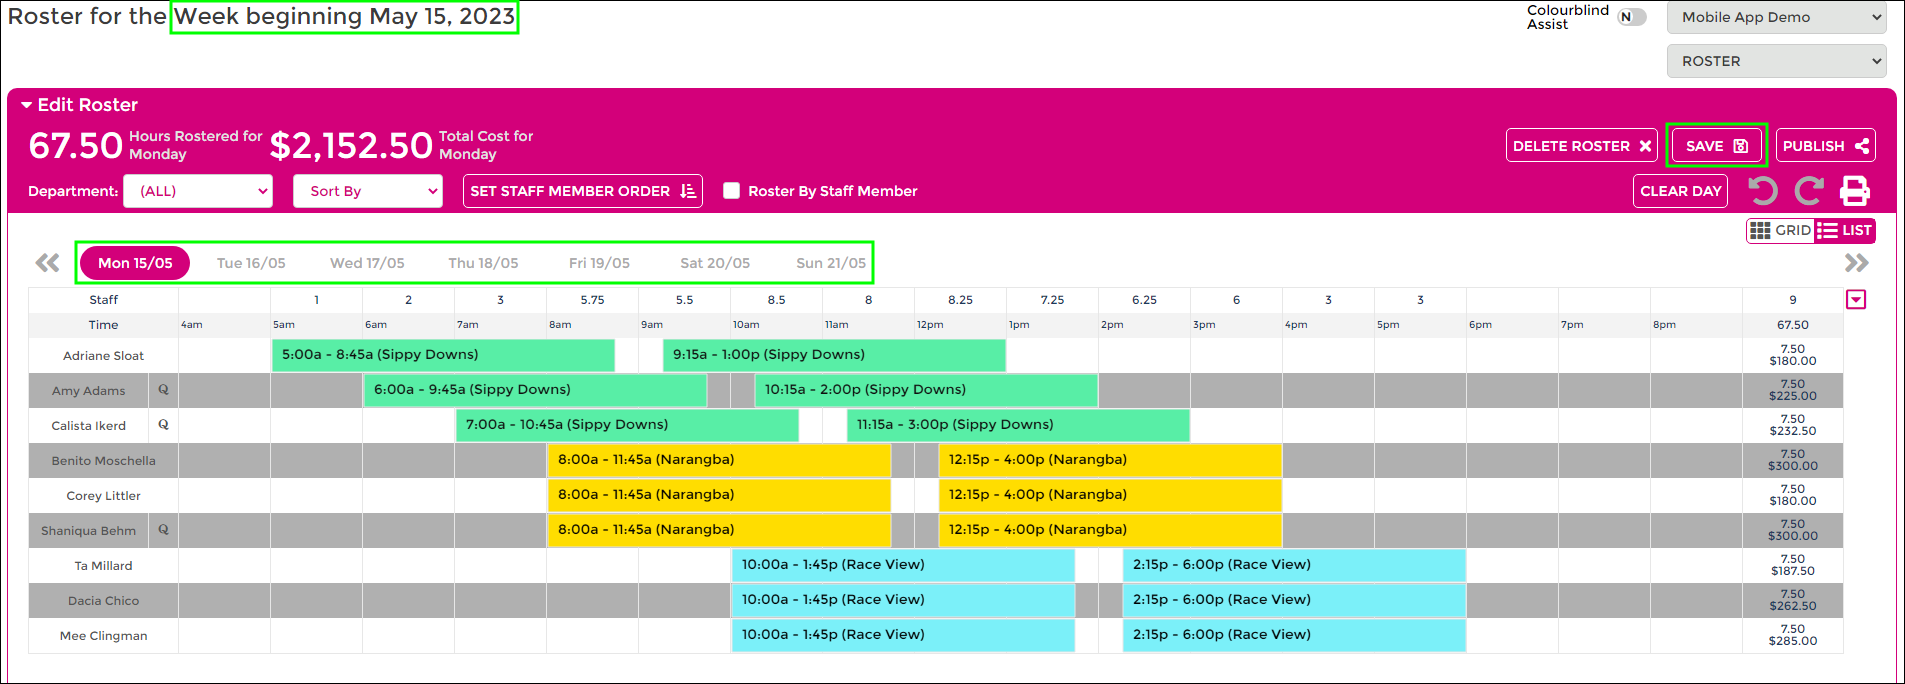
* Once created, you will see your dates running left to right, staff names and shifts depending on how you have created your template. | |||
**<b>NOTE:</b> When building templates, there are only <i>days</i>, no dates. | |||
<br> | |||
[[File:Roster-from-template.png]] [[File:Template-create-select.png|230px]] | |||
<br><br> | |||
[[File:Roster-dates.png]] | |||
<br> | |||
<br> | |||
* If you have shifts with no names, you can now assign these to staff! | |||
* Click (Select Staff) on the shift you need to give out. | |||
* Your staff list will appear; Unavailability will be displayed here too. | |||
* Click Select next to the name of the employee you want to give the shift to. | |||
* Your shift is now assigned! | |||
* Complete this for each available shift on each day in the roster. | |||
* Save as you go! | |||
<br> | |||
<b>HANDY TIP:</b> If you have a lot of unassigned shifts, using the [[Grid View]] can be useful for full roster visibility of all available shifts! | |||
<br><br> | |||
[[File:Assign-shift (1).png]] | |||
<br><br> | |||
[[File:Select-staff.png]] | |||
<br><br> | |||
[[File:Assigned-staff.png]] | |||
==Editing/Deleting Existing Templates== | ==Editing/Deleting Existing Templates== | ||
As we all know, staff, shift times and days can change over time. | |||
Thankfully your roster templates are never set in stone, and you can create more templates, edit existing data or completely remove templates from Wageloch. | |||
<br> | |||
===Add Staff/Shifts to Existing Template=== | |||
* On the Roster home screen, click the Rosters drop menu in the top right. | |||
* Select Templates. | |||
* Select the template you wish to view. | |||
* Select the day to create shifts on. | |||
* Click the Add button in the bottom right hand corner; a shift row will be created. | |||
* Choose whether to add a staff member in, or just a shift (see [[Roster_Templates#Set_Staff_and_Shifts|Set Staff and Shifts]] or [[Roster_Templates#Set_Shifts_with_No_Staff|Set Shifts with No Staff]]). | |||
* Click Save to update your template with changes. | |||
===Edit/Remove Shifts in Existing Template=== | |||
* On the Roster home screen, click the Rosters drop menu in the top right. | |||
* Select Templates. | |||
* Select the template you wish to view. | |||
* Select the day you need to remove staff or shifts from. | |||
** <b>To edit start/finish times:</b> Hover over the edges of shift bars and left-click/drag around to change start/finish times. | |||
** <b>To remove an entire shift row:</b> Right-click in a blank spot on the shift row. Select Delete Row. | |||
** <b>To unassign a shift:</b> Click the name of someone already in the template and set to (Unselect) to make this an available shift. | |||
** <b>To reassign a shift:</b> Click (Select Staff) or the name of someone in the template, select a staff member from the list. | |||
* Click Save to update your template with changes. | |||
===Delete Template=== | |||
* On the Roster home screen, click the Rosters drop menu in the top right. | |||
* Select Templates. | |||
* Select the template you wish to view. | |||
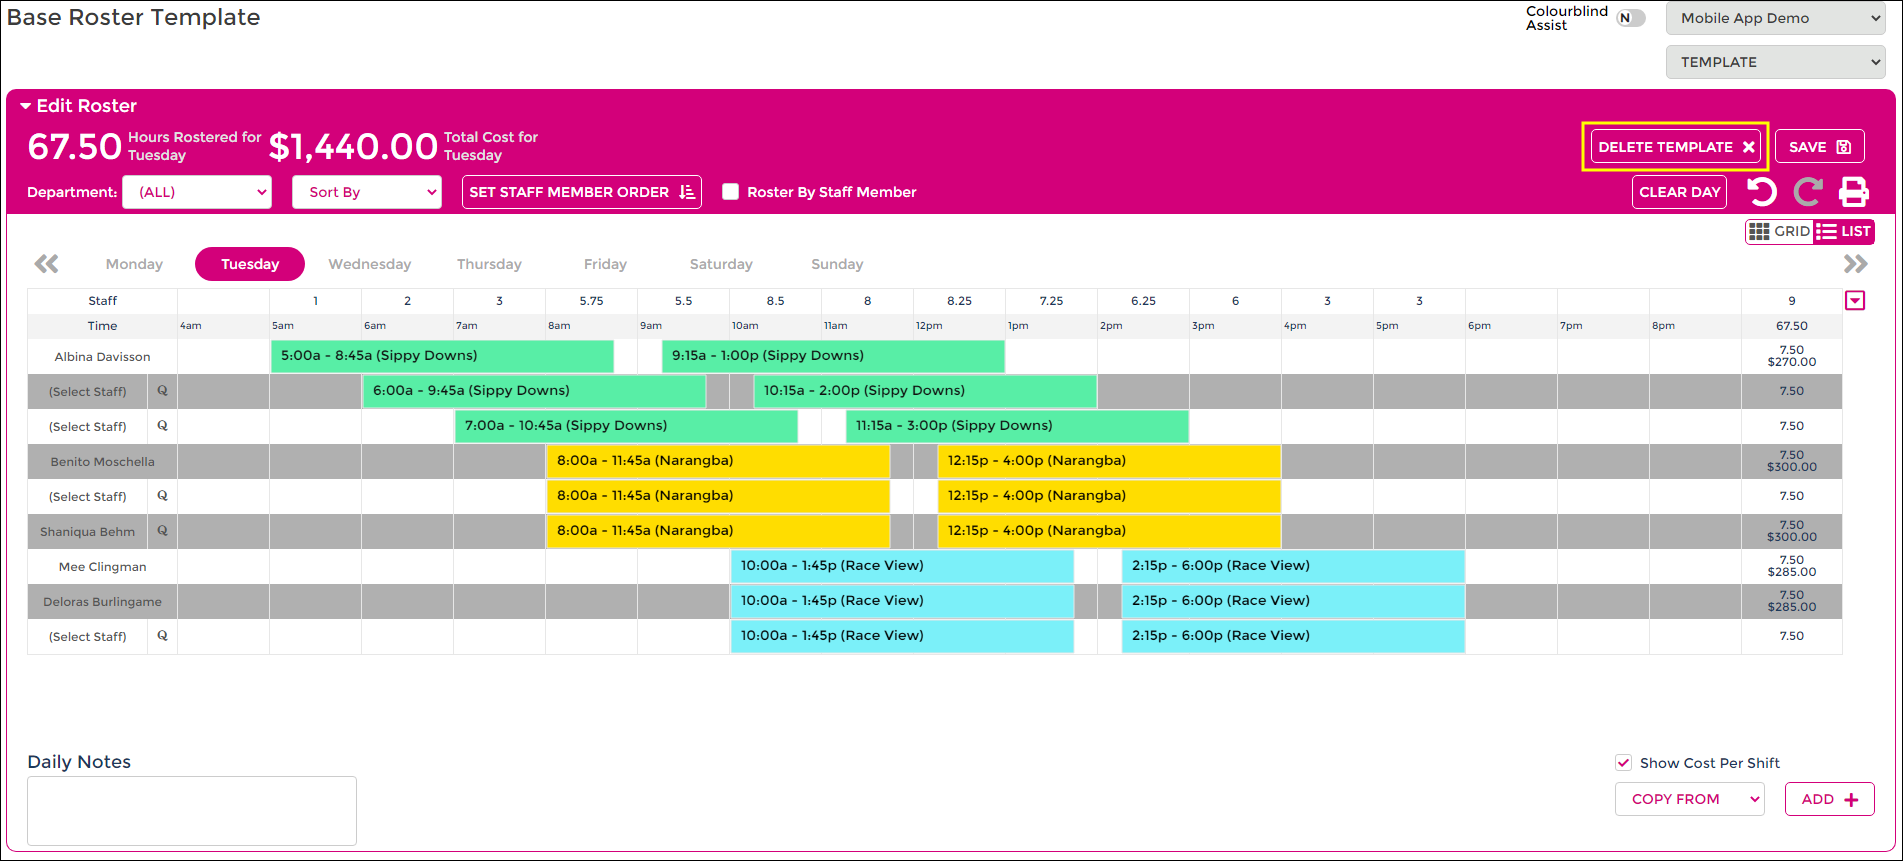
* Click the Delete Template button. | |||
** <b>NOTE:</b> When using [[Departments_%26_Roles|Departments]] templates can only be deleted if you have unrestricted access. See more information in our article in [[Users & Security]]. | |||
<br><br> | |||
[[File:Delete-template.png]] | |||
<br><br> | |||
=Rotation Templates= | |||
Rotation templates are slightly more complex than your normal [[Roster_Templates| Templates]] as they rely on the <b>start date</b> of the rotation to be set correctly. | |||
If set right, creating rosters from rotations needs only a date to know which week/fortnight you're in and which staff are visible in the roster. | |||
This tool is useful if you have multiple weeks of shifts or people that rotate through, such as: | |||
* 3 week rotation. | |||
* 15 employees scheduled each period, Monday to Friday hours only. | |||
* 3 Teams with 5 staff allocated to each: Team A, B, C. | |||
* Shift times are a set schedule for morning (4AM - 12PM), afternoon (10AM - 6PM) and night (5PM - 12AM) | |||
* Rotation Week 1: Team A - Morning, Team B - Afternoon, Team C - Night | |||
* Rotation Week 2: Team A - Afternoon, Team B - Night, Team C - Morning | |||
* Rotation Week 3: Team A - Night, Team B - Morning, Team C - Afternoon. | |||
<br><br> | |||
In this article we'll be walking through how to enable rotation templates, where to create the rotations and how to create your rosters once they're setup up. | |||
If you have any questions or require assistance with your rotation templates, please don't hesitate to contact our '''<b>[https://wageloch.com.au/contact Helpdesk]</b>'''. | |||
==Enabling Rotations== | |||
To enable rotation templates, you need to know the following information to ensure your data will be correct: | |||
* Which date <b>week 1</b> in your rotation commences. | |||
* How many weeks/fortnights your rotation must go through before returning to week 1. | |||
* The staff/shifts who will be entered into the templates | |||
<br> | |||
With the information above, complete the steps below: | |||
<br> | |||
* Open Wageloch and sign in. | |||
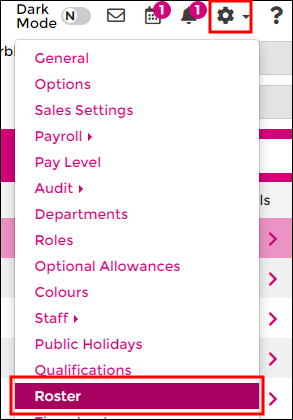
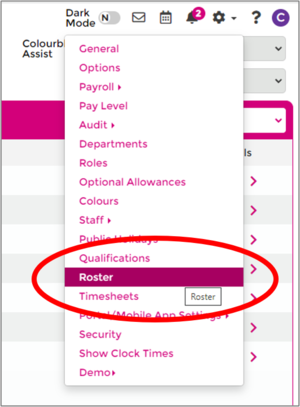
* Click on the Settings cog (top right corner) and select Rosters from the menu. | |||
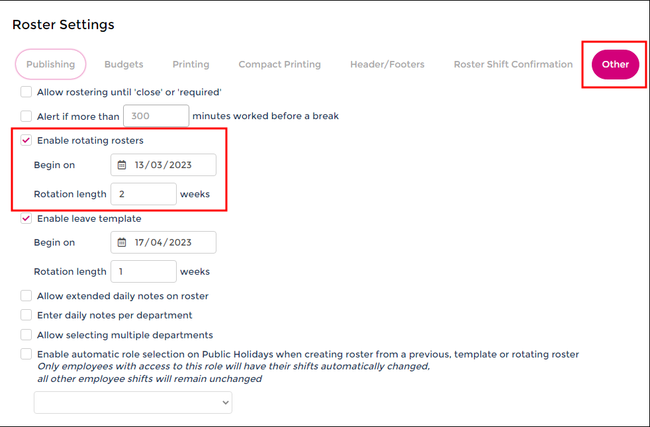
* With the Roster Settings menu open, select the Other category. | |||
* Tick the box to Enable rotating roster | |||
* Enter the date <b>week 1</b> will begin. | |||
* Enter how many weeks/fortnights your rotation length will last for before resetting. | |||
** NOTE: If you roster fortnightly and are on a 5 week rotation, you would need to set the rotation length to 5 fortnights. | |||
* Click Done in the bottom right corner to save. | |||
<br> | |||
[[File:Settings-roster (1).png]] [[File:Rotation-enable (1).png|650px]] | |||
==Creating Rotation Templates== | |||
* Once your rotation template has been enabled, click Rosters from the top left to return to the home screen. | |||
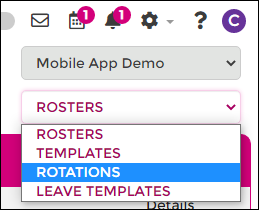
* In the Rosters drop menu (top right), select Rotations from the menu. | |||
* You'll now be presented with multiple weeks/fortnights to create rotations in. | |||
* Starting with week/fortnight 1, add in your shifts and/or staff; ideally the things that are static and not change. | |||
** <b>NOTE:</b> This step is the same as creating a <b>[[Creating_Rosters#Basic_Roster_Creation | standard roster]]</b> | |||
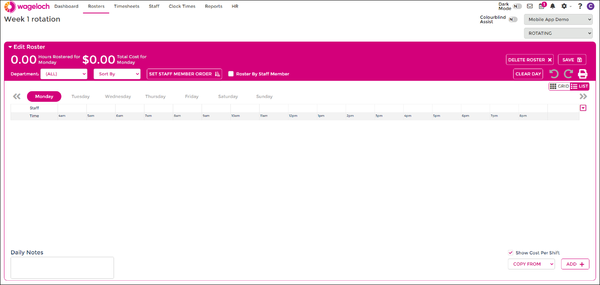
** <B>TIP:</b> You can use the Copy From tool in the bottom right to copy from an existing roster or roster template. | |||
* Make sure to save as you go. | |||
* Complete this for each of the individual rotation templates. | |||
<br> | |||
[[File:Menu-rotation (1).png]] [[File:Rotation-home.png|900px|]] | |||
<br><Br> | |||
[[File:Rotation-template (1).png|600px|]] [[File:Copy-from (1).png]] | |||
==Creating a Roster from Rotations== | |||
* Return to your home screen by click Rosters in the top left menu. | |||
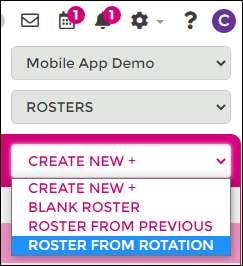
* Click Create New >> From Rotation | |||
* Select the date your roster will start; the date selected will determine which week/fortnight the rotation will be copied from. | |||
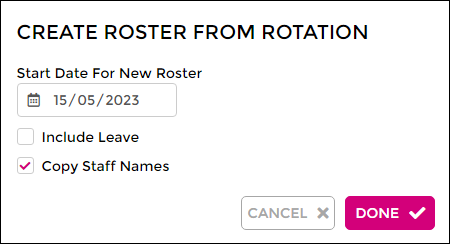
** To copy names and shifts into the roster, keep the Copy Staff Names box ticked. Unticking this option will copy shifts only. | |||
* Click Done to create your roster. | |||
<br> | |||
If your rotation dates and template has been created correctly, you should now have a roster with dates, staff and shift times! | |||
<br> | |||
You're still able to make modifications within your roster, and these changes will not affect your rotation templates. | |||
<br><br> | |||
=Leave Templates= | |||
Creating leave templates in Wageloch has the benefit of making leave booking easier in the long run, especially if your staff don’t typically work a standard eight-hour shift. | |||
This document will outline: | |||
* Creating roster leave templates for all applicable staff entitled to leave | |||
** Same format as a roster | |||
** Includes all employee’s standard hours in bulk | |||
** Can be set in rotations | |||
*Individual leave templates | |||
** Configure leave templates for each employee one at a time | |||
** Only include normal shifts | |||
==Roster Leave Templates== | |||
===Enabling the Template=== | |||
[[File:1.1 Rosters.png|300px|thumb|right]] | |||
* Open Wageloch and sign in. | |||
* Click on the Settings cog in the top right | |||
* Select Rosters from the menu. | |||
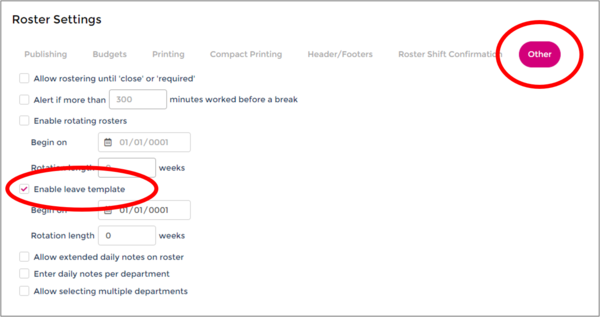
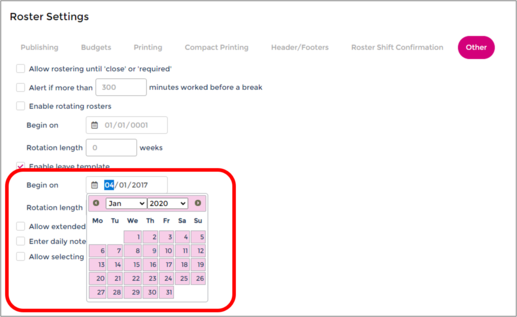
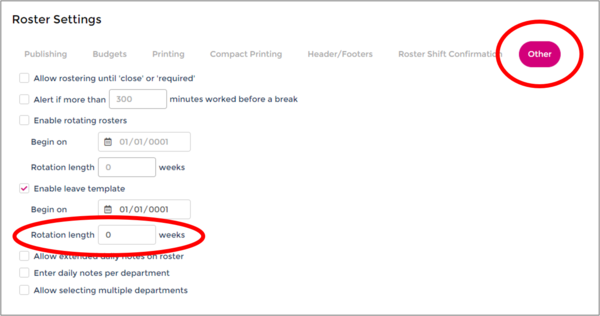
* In the Other section, tick Enable Leave Template. | |||
* Pick date when the template will commence (can backdate if needed) | |||
* Select how long the template will be for (1 week/fortnight, etc.) | |||
* Done to save. | |||
<br> | |||
[[File: 1.1 Other Enable Leave Template.png|600px]] [[File: 1.1 Commencement Date.png|517px]] | |||
[[File: 1.1 Rotation Length.png|600px]] | |||
===Creating the Template=== | |||
* After enabling the template, click on Rosters in the top left menu. | |||
* In the top right corner in the Rosters drop menu, select Leave Template. | |||
* Select the week/fortnight in question; this relies on your normal roster cycle. | |||
** You’ll notice this is the same formatting as a roster, however there are only days, no dates. | |||
** This will ignore roster tools like leave and unavailability. | |||
<br> | |||
[[File: NEW-LEAVE-TEMPLATE.png|900px]] | |||
<br> | |||
<br> | |||
[[File: NEW-LEAVE-TEMPLATE-2.png|900px]] | |||
<br> | |||
* You can create your leave template in a few different ways: | |||
** From blank, adding in shifts/staff as you go on the daily mode. | |||
** From blank, switching to Roster by Staff Member to do one person at a time. | |||
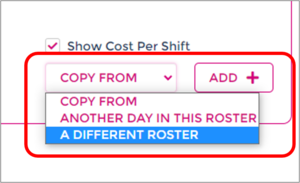
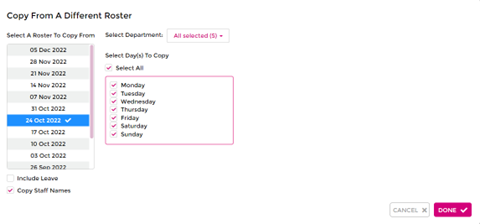
** Use the Copy From tool in the bottom right to copy from a previous roster or another template. | |||
* Once you’ve added in shifts for all the staff eligible for leave, click Save. | |||
* Your Roster Template is now ready to use! | |||
[[File:NEW-TEMPLATE-DAILY.png|850px]] | |||
[[File: 1.2 Roster by Staff Member.png|850px]] | |||
[[File: 1.2 Copy From.png|300px]] [[File: 1.2 Copy from Different Roster.png|600px]] | |||
<br> | |||
==Individual Leave Template== | |||
===Creating the Template=== | |||
[[File: NEW-INDI-TEMP.PNG|500px|thumb|right|Full view of Individual Template]] | |||
<b>Please note:</b> The Roster Leave Template must be disabled for this to work. | |||
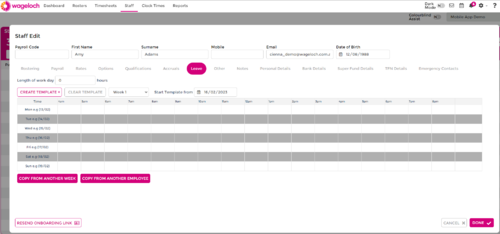
* Click on Staff in the top left menu. | |||
* Select the name of the employee you wish to add the template for. | |||
* Select the Leave category on the staff card. | |||
<br> | |||
[[File: 2.1 Staff.png|800px]] | |||
[[File: NEW-INDI-TEMP-ZOOM.png|800px]] | |||
<br> | |||
* Here you can configure the individual leave template in a few different ways: | |||
** Set default length of work day to __ hours | |||
** Create multiple templates for multiple weeks | |||
** Manually add in their shifts if they vary day to day and hours in the shift. | |||
* Be sure to set a date to Start Template from. | |||
* Done to save. | |||
<br> | |||
[[File:NEW-INDI-TEMP-SHIFT.png|800px]] | |||
==Applying the Leave Template== | |||
===Portal/Mobile App Requests=== | |||
* Open Wageloch and sign in | |||
* Click the Leave Calendar icon in the top right. | |||
* Under the Pending Requests category, you should have a pending request. | |||
* Click on the name of the employee. | |||
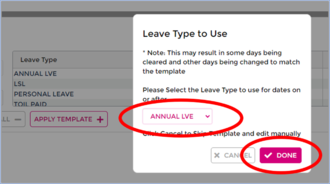
* When viewing their request, it will automatically appear with a prompt to apply a leave template. | |||
* Select the leave type you wish to use and click Done to apply. | |||
* Click Save to approve the leave request. | |||
<br> | |||
<center>[[File: 3.1 Leave Calendar.png|300px]]</center> | |||
<Br> | |||
[[File: 3.1 Pending requests.png|1085px]] [[File: 3.1 Leave type and Done.png|330px]] | |||
===Manual Leave Bookings=== | |||
* Open Wageloch and sign in | |||
* Click the Leave Calendar icon in the top right. | |||
* Select Calendar from the menu categories. | |||
* Click Create Leave in the bottom left. | |||
* Select the employee name from the list. | |||
* Select the date range you wish to book leave for. | |||
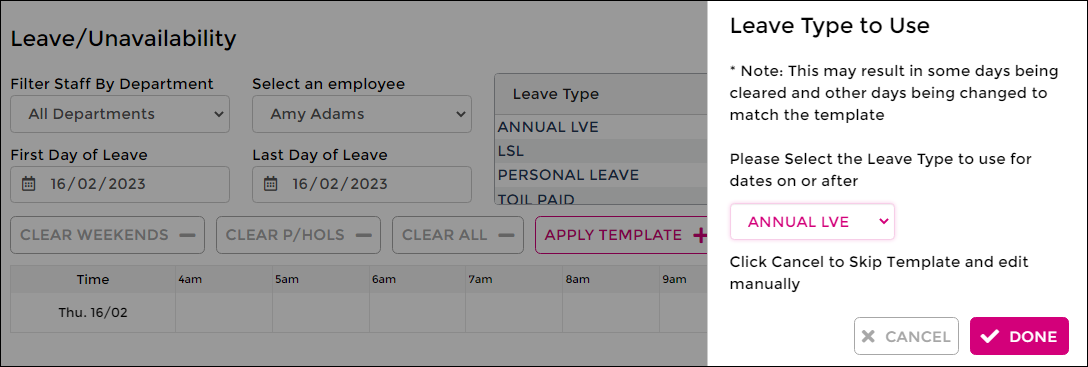
* You should see a button Apply Leave Template; click it. | |||
* Select the leave type you wish to use and click Done to apply. | |||
* Click Save to approve the leave request. | |||
<br> | |||
<center> | |||
[[File: 3.1 Leave Calendar.png|350px]] [[File:3.2 Select Calendar.png|575px]] [[File: 3.2 Create Leave +.png|300px]] | |||
<br> | |||
[[File:LVE-TEMP-APPLY.png]] | |||
</center> | |||
<br> | |||
<br> | |||
<br> | |||
[[File:Back-button-new.png|link=Edit/Delete Approved Leave]] [[File:Home-button-new.png|link=Main Page]] | |||
[[File:Roster-home.png]] | |||
<Br><br> | |||
[[File:Create-from-rotation (1).png]] [[File:Roster-from-rotate (1).png|490px]] | |||
<br> | |||
<br> | |||
[[File:Back-button-new.png|link=Creating Rosters]] [[File:Home-button-new.png|link=Main Page]] [[File:Next-button-new.png|link=Rotation Templates]] | |||
Latest revision as of 02:35, 2 December 2024
Using roster templates can make your rostering life easier, whether you have staff working set days and shifts, set shifts that need to be allocated to staff, or just need to add a standard roster into the system as a guide for your timesheets!
In this article we will be covering the different methods of how roster templates can be formed:
- Set staff and shifts
- Set shift times with no staff
- Set staff/shift and set shift times.
If you get stuck or have any questions, please don't hesitate to contact Wageloch Helpdesk.
Creating a Template
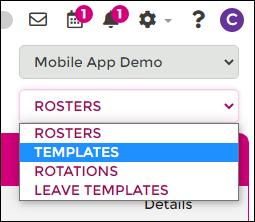
- On the Roster home screen, click the Rosters drop menu in the top right.
- Select Templates.
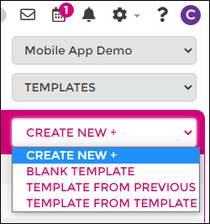
- Click Create New and select one of the following options:
- Blank Roster - to start with an empty template
- Template from Previous - use an existing roster to pre-fill your template.
- Template from Template - use an existing template to pre-fill a new template.
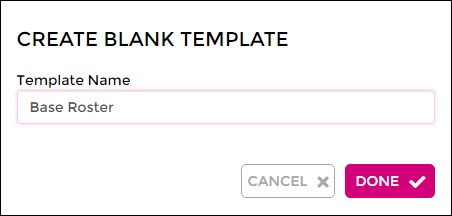
- For this example we'll be working with a blank roster and build it from scratch.
- Note: You can create multiple roster templates, but if your roster rotates, please check our guide on Rotation Templates.
- Give the template a name and click Done to generate.
HANDY TIP: Use the Copy From menu in the bottom right to copy data from day to day, a previous roster, another template and more!
Set Staff and Shifts
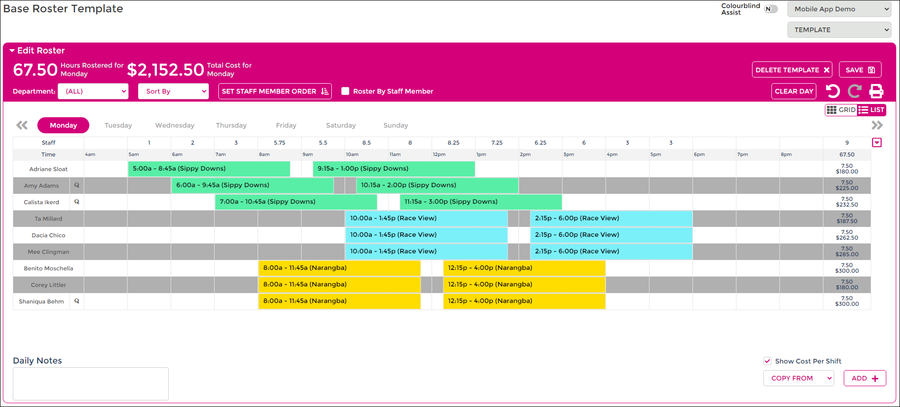
Thankfully this aspect of creating a template is identical to basic roster creation.
- Select the day to create shifts on.
- Click the Add button in the bottom right hand corner; a shift row will be created.
- On the shift row, click (Select Staff)
- Tick the boxes next to the names of the employees who will always be working this day.
- Add the desired shift start and finish times for each employee; add breaks as required.
- Click Save.
- Repeat for each day, or use the Copy From tool.
Be sure to click Save as you build!
Set Shifts with No Staff
This method of building is still very similar to basic roster creation but there is a slight variation.
Creating set shifts with no staff names is useful for rosters that have set shifts but the staff will flex and change depending on workload and staff availability.
When the roster is created from this style of template, your staff leave and availability are then reflected in the dates and shifts can then be assigned out.
- Select the day to create shifts on.
- Click the Add button in the bottom right hand corner multiple times; add as many rows as you need for that day.
- Add the shifts in; follow the Adding in Shift Bars area if unsure how.
- Click Save for each day as you build.
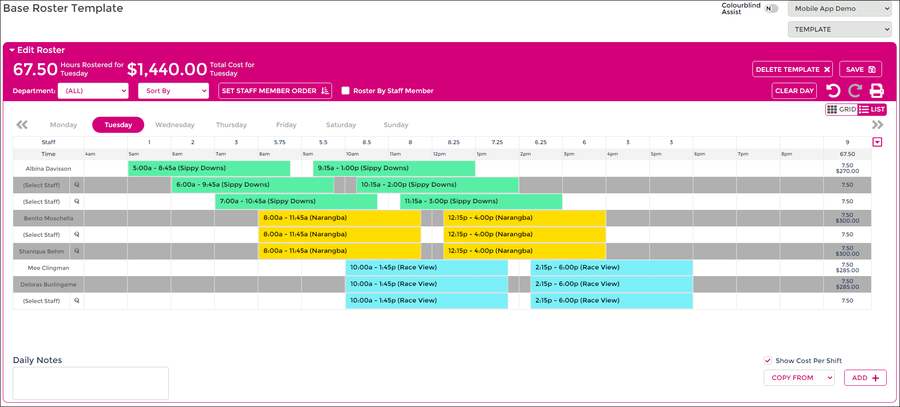
Set Staff/Shifts and Shifts with No Staff
This method is a hybrid of using set staff with shifts and set shifts with no names.
Follow the steps above to add in staff with their set shifts, and shifts with no staff name to be allocated out during the roster creation phase.
Creating Roster from Template
- Open Wageloch and sign in
- On the Roster homescreen, click Create New+ and select From Template
- The roster start date will align with your timesheet period and/or the end date of your previous roster.
- Select the name of the template you wish to copy from.
- Copy Staff Names to be ticked; brings names of staff in the template over.
- Leave Copy Leave to remain unticked; only used in special circumstances.
- Click Done to create your roster.
- Once created, you will see your dates running left to right, staff names and shifts depending on how you have created your template.
- NOTE: When building templates, there are only days, no dates.
- If you have shifts with no names, you can now assign these to staff!
- Click (Select Staff) on the shift you need to give out.
- Your staff list will appear; Unavailability will be displayed here too.
- Click Select next to the name of the employee you want to give the shift to.
- Your shift is now assigned!
- Complete this for each available shift on each day in the roster.
- Save as you go!
HANDY TIP: If you have a lot of unassigned shifts, using the Grid View can be useful for full roster visibility of all available shifts!


Editing/Deleting Existing Templates
As we all know, staff, shift times and days can change over time.
Thankfully your roster templates are never set in stone, and you can create more templates, edit existing data or completely remove templates from Wageloch.
Add Staff/Shifts to Existing Template
- On the Roster home screen, click the Rosters drop menu in the top right.
- Select Templates.
- Select the template you wish to view.
- Select the day to create shifts on.
- Click the Add button in the bottom right hand corner; a shift row will be created.
- Choose whether to add a staff member in, or just a shift (see Set Staff and Shifts or Set Shifts with No Staff).
- Click Save to update your template with changes.
Edit/Remove Shifts in Existing Template
- On the Roster home screen, click the Rosters drop menu in the top right.
- Select Templates.
- Select the template you wish to view.
- Select the day you need to remove staff or shifts from.
- To edit start/finish times: Hover over the edges of shift bars and left-click/drag around to change start/finish times.
- To remove an entire shift row: Right-click in a blank spot on the shift row. Select Delete Row.
- To unassign a shift: Click the name of someone already in the template and set to (Unselect) to make this an available shift.
- To reassign a shift: Click (Select Staff) or the name of someone in the template, select a staff member from the list.
- Click Save to update your template with changes.
Delete Template
- On the Roster home screen, click the Rosters drop menu in the top right.
- Select Templates.
- Select the template you wish to view.
- Click the Delete Template button.
- NOTE: When using Departments templates can only be deleted if you have unrestricted access. See more information in our article in Users & Security.
Rotation Templates
Rotation templates are slightly more complex than your normal Templates as they rely on the start date of the rotation to be set correctly. If set right, creating rosters from rotations needs only a date to know which week/fortnight you're in and which staff are visible in the roster.
This tool is useful if you have multiple weeks of shifts or people that rotate through, such as:
- 3 week rotation.
- 15 employees scheduled each period, Monday to Friday hours only.
- 3 Teams with 5 staff allocated to each: Team A, B, C.
- Shift times are a set schedule for morning (4AM - 12PM), afternoon (10AM - 6PM) and night (5PM - 12AM)
- Rotation Week 1: Team A - Morning, Team B - Afternoon, Team C - Night
- Rotation Week 2: Team A - Afternoon, Team B - Night, Team C - Morning
- Rotation Week 3: Team A - Night, Team B - Morning, Team C - Afternoon.
In this article we'll be walking through how to enable rotation templates, where to create the rotations and how to create your rosters once they're setup up.
If you have any questions or require assistance with your rotation templates, please don't hesitate to contact our Helpdesk.
Enabling Rotations
To enable rotation templates, you need to know the following information to ensure your data will be correct:
- Which date week 1 in your rotation commences.
- How many weeks/fortnights your rotation must go through before returning to week 1.
- The staff/shifts who will be entered into the templates
With the information above, complete the steps below:
- Open Wageloch and sign in.
- Click on the Settings cog (top right corner) and select Rosters from the menu.
- With the Roster Settings menu open, select the Other category.
- Tick the box to Enable rotating roster
- Enter the date week 1 will begin.
- Enter how many weeks/fortnights your rotation length will last for before resetting.
- NOTE: If you roster fortnightly and are on a 5 week rotation, you would need to set the rotation length to 5 fortnights.
- Click Done in the bottom right corner to save.
Creating Rotation Templates
- Once your rotation template has been enabled, click Rosters from the top left to return to the home screen.
- In the Rosters drop menu (top right), select Rotations from the menu.
- You'll now be presented with multiple weeks/fortnights to create rotations in.
- Starting with week/fortnight 1, add in your shifts and/or staff; ideally the things that are static and not change.
- NOTE: This step is the same as creating a standard roster
- TIP: You can use the Copy From tool in the bottom right to copy from an existing roster or roster template.
- Make sure to save as you go.
- Complete this for each of the individual rotation templates.
Creating a Roster from Rotations
- Return to your home screen by click Rosters in the top left menu.
- Click Create New >> From Rotation
- Select the date your roster will start; the date selected will determine which week/fortnight the rotation will be copied from.
- To copy names and shifts into the roster, keep the Copy Staff Names box ticked. Unticking this option will copy shifts only.
- Click Done to create your roster.
If your rotation dates and template has been created correctly, you should now have a roster with dates, staff and shift times!
You're still able to make modifications within your roster, and these changes will not affect your rotation templates.
Leave Templates
Creating leave templates in Wageloch has the benefit of making leave booking easier in the long run, especially if your staff don’t typically work a standard eight-hour shift. This document will outline:
- Creating roster leave templates for all applicable staff entitled to leave
- Same format as a roster
- Includes all employee’s standard hours in bulk
- Can be set in rotations
- Individual leave templates
- Configure leave templates for each employee one at a time
- Only include normal shifts
Roster Leave Templates
Enabling the Template
- Open Wageloch and sign in.
- Click on the Settings cog in the top right
- Select Rosters from the menu.
- In the Other section, tick Enable Leave Template.
- Pick date when the template will commence (can backdate if needed)
- Select how long the template will be for (1 week/fortnight, etc.)
- Done to save.
Creating the Template
- After enabling the template, click on Rosters in the top left menu.
- In the top right corner in the Rosters drop menu, select Leave Template.
- Select the week/fortnight in question; this relies on your normal roster cycle.
- You’ll notice this is the same formatting as a roster, however there are only days, no dates.
- This will ignore roster tools like leave and unavailability.
- You can create your leave template in a few different ways:
- From blank, adding in shifts/staff as you go on the daily mode.
- From blank, switching to Roster by Staff Member to do one person at a time.
- Use the Copy From tool in the bottom right to copy from a previous roster or another template.
- Once you’ve added in shifts for all the staff eligible for leave, click Save.
- Your Roster Template is now ready to use!
Individual Leave Template
Creating the Template
Please note: The Roster Leave Template must be disabled for this to work.
- Click on Staff in the top left menu.
- Select the name of the employee you wish to add the template for.
- Select the Leave category on the staff card.
- Here you can configure the individual leave template in a few different ways:
- Set default length of work day to __ hours
- Create multiple templates for multiple weeks
- Manually add in their shifts if they vary day to day and hours in the shift.
- Be sure to set a date to Start Template from.
- Done to save.
Applying the Leave Template
Portal/Mobile App Requests
- Open Wageloch and sign in
- Click the Leave Calendar icon in the top right.
- Under the Pending Requests category, you should have a pending request.
- Click on the name of the employee.
- When viewing their request, it will automatically appear with a prompt to apply a leave template.
- Select the leave type you wish to use and click Done to apply.
- Click Save to approve the leave request.

Manual Leave Bookings
- Open Wageloch and sign in
- Click the Leave Calendar icon in the top right.
- Select Calendar from the menu categories.
- Click Create Leave in the bottom left.
- Select the employee name from the list.
- Select the date range you wish to book leave for.
- You should see a button Apply Leave Template; click it.
- Select the leave type you wish to use and click Done to apply.
- Click Save to approve the leave request.
