Task Templates
Task Templates are used to schedule yourself in reminders to complete a Task in the future, such as:
- Obtaining copies of updated licenses and certificates.
- Completing employee reviews
- Checking FairWork for award or pay updates
Task Templates can be created as a once off instance, a recurring task and has the ability to be escalated if not actioned.
When assigning to a staff member, email address or escalation point, your tasks will be sent as an email with the ability to mark them as complete.
In this article we'll be going through:
- Elements task template creation
- Workflow of setting up a task template
- How to create a task (with/without template)
- How to action a task when due
If you're experiencing difficulties following these steps or have any additional questions, please don't hesitate to Helpdesk
Task Elements
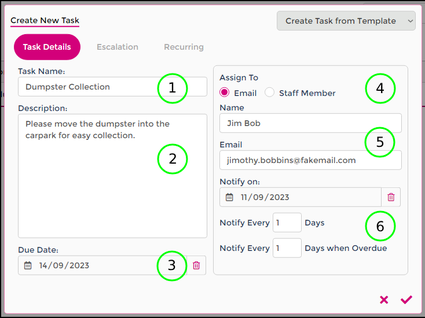
When setting up a Task Template or creating a task as a once-off occurrence, the fields in the form are near identical - keep a close eye on what you're doing!
The main difference is when using a template to create a task information will be pre-filled based on the Task Template, whereas creating a once-off Task will require you to fill each field out.
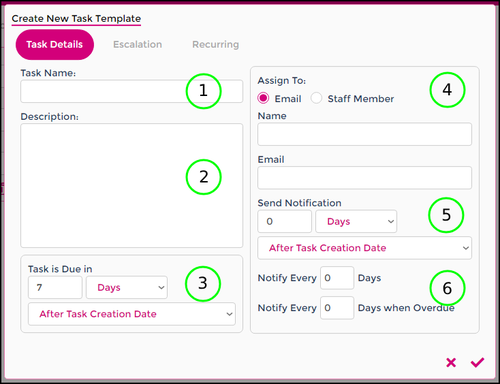
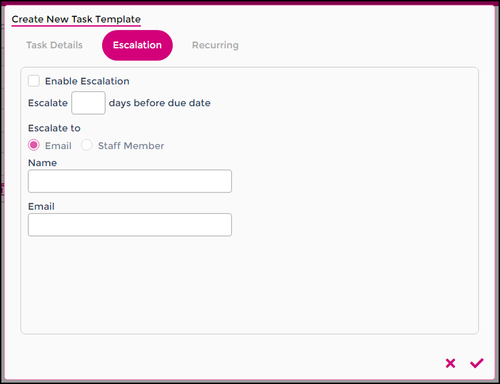
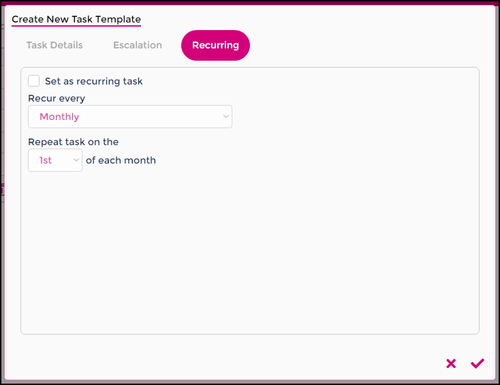
Below we'll be discussing each element of the task form and its behavior.
Task Templates
Escalation
Recurring
Create Task Template
Now that we've learned about the different fields available in a Task Template, let's create our first template!
Example:
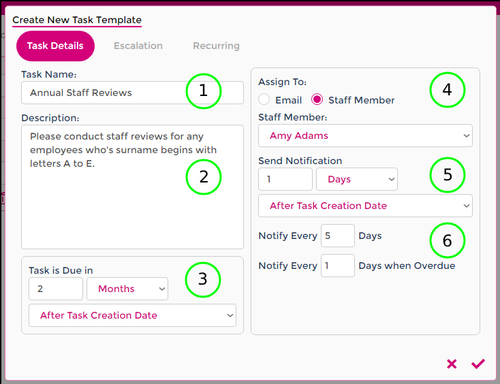
- We need to set a task up for our store manager Amy Adams
- Amy needs to conduct annual reviews for staff members with surnames beginning with letters A through to E.
- We want to give Amy enough notice of the due date of this task.
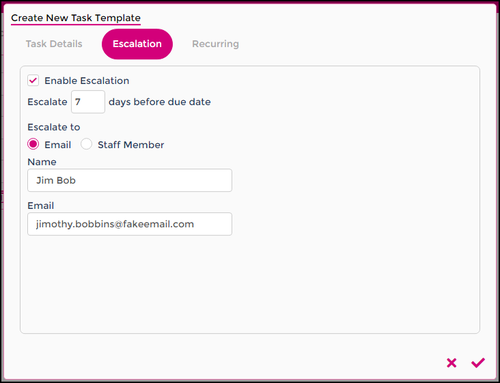
- If Amy doesn't mark this task as complete, we need to escalate to the retail manager Jim Bob.
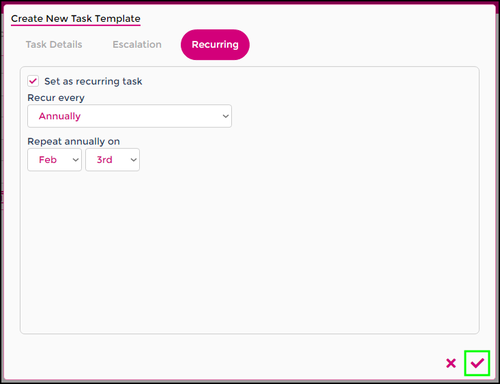
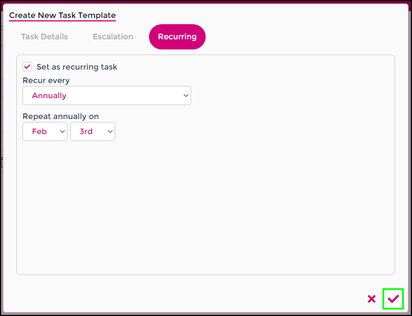
- Our task will repeat each year on the 3rd of February.
Following the layout of the template fields, we can easily build our template based on the example information provided.
Create New Task
Creating a task is pretty straight forward, we just need to determine if we're going to use an existing Task Template, or create this as a once off task.
Below we'll learn how to create a task through both methods - you'll likely notice they're fairly similar.
![]()
- Click on the Task icon in the top right corner.
- In the Tasks screen you'll see:
- Any Incomplete tasks waiting to be actioned, indicated by the Incomplete drop menu in the top right.
- A Search bar to look for a particular task.
- A drop menu filter to see tasks that are Incomplete, Complete or All.
- TIP: Feel free to change between List and Grid view to change the layout of the Tasks screen.
From Task Template
- Click New Task +
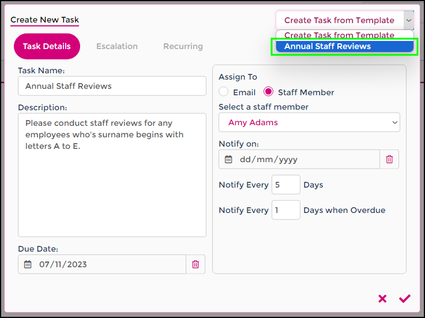
- When your New Task window appears, click Create Task from Template.
- Select the name of your template: Annual Staff Review.
- You'll notice this will pre-fill some information based on the template we created.
- Due Date: We can now opt to set a new due date or leave the existing one as is, as our template was set for 2 months from task creation date..
- Assign To: As per the template, Amy is selected to receive notifications about these annual reviews. We can change this if need be.
- Notify On: Set your desired start for Amy to start receiving notifications.
- Notify Every: 5 days when not marked as complete, and 1 day if task is overdue.
Escalation
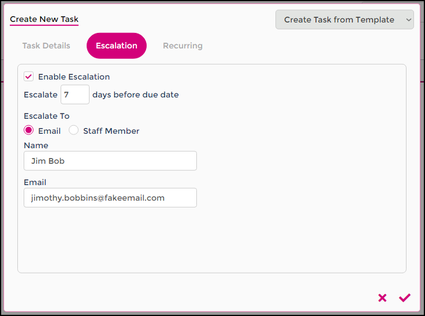
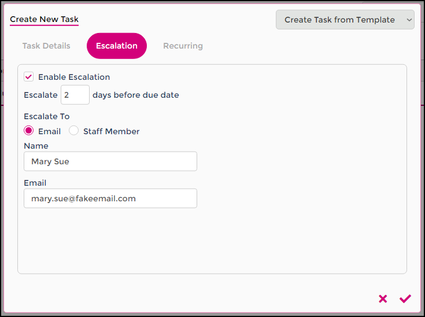
As per our template, we have escalation enabled which will notify our retail manager Jim Bob 7 days before the due date.
We can edit this if the escalation point has changed.
Recurring
Our template has pre-filled this area to confirm this is recurring annually on the 3rd of February - again we can edit this if needed.
- Once you've checked all the information in your task, click the Tick in the bottom right corner to create your task.
- This will now send an email to your Assign To contact to advise they have a task to complete.
Once Off Creation
- Click New Task +
- When your New Task window appears, you can start filling out the fields as needed.
- Due Date: Select the due date of your task.
- Assign To: Enter the details of the person to complete the task, or assign it to a staff member within Wageloch.
- Notify On: Select the date notifications will commence emailing.
- Notify Every: Choose how often notifications will be emailed when the task is not complete, and how often they'll occur when the task is overdue.
Escalation
Choose whether you'd like to enable escalation, how soon before the due date the notifications will escalate and who they will escalate to.
Recurring
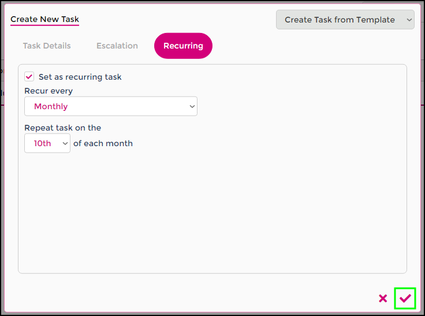
Opt to make this new task ongoing and how often/when it will repeat.
- Once you've checked all the information in your task, click the Tick in the bottom right corner to create your task.
- This will now send an email to your Assign To contact to advise they have a task to complete.
Actioning Tasks
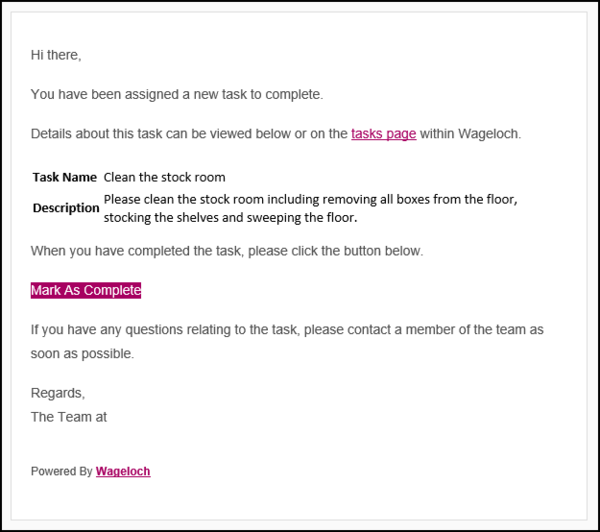
When assigning a task to an Email Address or Staff Member, an email will always be sent to the person you've nominated.
Within the email the recipient will be provided the following information:
- Task Name
- Description of the task requirements
- Mark as Complete button
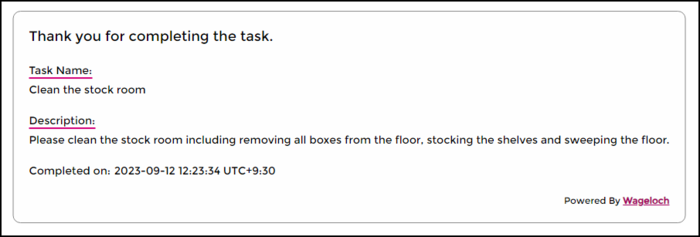
When the task has been done, Mark as Complete should be clicked.
This will stop any additional notification emails or escalation from occurring and change the status of the task in Wageloch from Incomplete to Complete.
