Mobile App Setup
Using the Wageloch Staff Portal and Mobile App can encourage staff to be proactive in requesting leave, submitting shift
availability and viewing their rosters.
They can view the rosters you publish, receive notifications of any changes and if you allow, they can view their team
members’ rosters as well.
Staff Portal refers to the website staff can access from a computer, which is https://portal.wageloch.com.au, whereas the
Mobile App refers to the Wageloch Mobile App application which is available for download from either to Google Play store (Android), or the App
Store (Apple).
The best part? The Staff Portal and Mobile App is included in your Wageloch subscription, so there are no additional
costs.
There are many benefits and customization in how the Portal/App behaves for staff, and what they can see/do.
- Staff can just view only their rosters, and nothing else.
- Staff can view their rosters and submit leave if they’re entitled.
- Staff can view their roster, everyone else’s roster, submit leave and availability.
You’re able to enable/disable features at your discretion.
Should you have any questions or concerns, please don't hesitate to contact Helpdesk for assistance.
Basic Requirements
To be able to configure the Wageloch Staff Portal and Mobile app, requirements are as follows:
- Your user access in Wageloch must be set for full administrator access.
- Staff cards in Wageloch must have an email address for creating their login credentials.
Please note that all employees must have their own individual email addresses; if there are any duplicates they will not be able to access the Staff Portal and Mobile App with this information.
Configuration via Wageloch
- Open Wageloch (web/desktop) and sign in.
- Click Settings in the top right corner.
- Select Staff Portal/ Mobile App from the menu
- Select Portal Setup from the menu
Setup Type
When loading the setup screen, you’ll be presented with the option of an Express or Advanced setup.
- Express Setup (recommended) gives the basic options and configuration settings to get you up and running.
- Advanced Setup provides much more detail and information to fine tune your needs.
Make your selection and click Next
Through this setup guide, we’ll be following the Express Setup method.
Security
In the Security area, you are able to set a staff member to gain additional permission in the Wageloch Mobile App and Staff Portal, while provide access to a Shift Swap function and Message Centre in the Wageloch Mobile App.
This does not allow the user to see any dollar figures or similar administrative access.
- Shift Swap helps the portal admin to facilitate requesting staff to swap shifts.
- Message Centre allows the portal admin to send notifications to staff.
Set Existing Employee as Admin
- Select Yes to set up Administrative Access
- Ensure Select a Staff Member is selected
- From the list of employees, tick the box next to their name to give access.
- Click Next to continue.
Set Non-Staff Administrator
- Select Yes to set up Administrative Access
- Ensure Enter a non-staff Member is selected
- Enter a first name, surname and email address.
- Click Next to continue.
Express Selection
In the Express Selection area, we can pick and choose what we would like staff to see and do in the Staff Portal and Wageloch Mobile App.
- Do you wish to allow viewing of Rosters using the portal?
- Yes: Staff can see their own rosters
- No: Staff cannot see rosters at all.
- Allow Staff to View The Complete Roster showing all staff in the roster
- This will allow staff to see their own rosters and everyone else’s as well.
- Do you wish to allow Staff to Request Leave using the portal?
- Yes: Staff can send leave requests to management for approval.
- No: Staff cannot send leave requests.
- Do you wish to show information about other staff on leave to the employee requesting leave?
- Show Employee Names: Will show the names of anyone else booked off on the day employee is trying to apply for.
- Show Count Only: Will only show the number of other people booked on the day.
- Do you wish to allow Staff to Request Unavailability using the portal?
- Yes: Staff can send through days they can/can’t work to management for approval.
- No: Staff cannot send their availability through.
- Click Next to continue
Email Details
- If you would like to receive an email when a staff member sends a request through, you must enable this option and enterone or more email addresses.
- If entering more that one email address, please separate with a comma.
- This will also facilitate staff receiving emails from management once their requests have been actioned.
- Click Next to Continue.
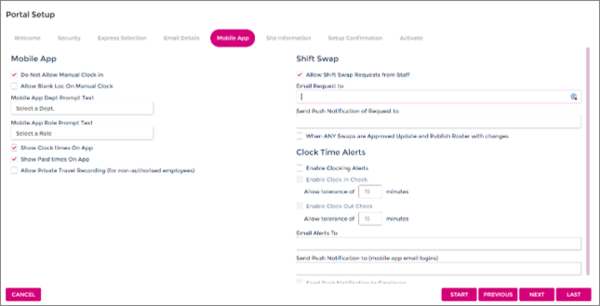
Mobile App
The column on the left of this page relates to certain options within the Mobile App relating to mobile clocking.
The columns on the right are additional tools that can be enabled by managers for staff to use.
| Mobile Clocking | |
|---|---|
| Do not allow manual clock in | If Mobile Clocking is enabled, prevent staff from logging clock times without GPS location information. |
| Allow blank Loc (Location) on Manual Clock | Does not provide a field during manual clocking to add a location name. |
| Mobile App Dept. Prompt Text | Depending on your configuration, we can prompt staff to clock into the department they’re working in for the shift that day. This prompt text allows you to customize the prompt, such as Select Department, Select Team, Select Job. |
| Mobile App Role Prompt Text | Depending on your configuration, we can prompt staff to clock into the role or job they’re working on that day. This prompt text allows you to customize the prompt, such as Select Role, Select Job, Select Project. |
| Show Clock Times on App | Allows staff to run their own clock times report to check their clock times, providing Mobile Clocking is enabled. This will always be enabled. |
| Show Paid Times on App | Allows staff to see what hours/times you’re finalizing them into the timesheet for. This can be useful, however as you could change the timesheet hours at any point, we allow this to be turned on/off as required. |
| Allow Private Travel Recording | Gives access to the Travel Logbook to record travel kilometres but will not record in the timesheets for payroll processing. |
| Staff Tools | |
|---|---|
| Shift Swaps | Please refer to our separate article on Shift Swaps. |
| Clock Time Alerts |
Clock time alerts allow you to send push notifications to staff on the Wageloch Mobile App to remind them to clock in/out if they’ve forgotten or are running late for their scheduled shift.
You’re also able to send notifications to yourself through the app as well, or even through email to provide you with a record of the employee not clocking in.
|
Site Information
Most of the information in this area is pre-filled with your business information. Please check and confirm it is correct.
The other three options displayed relate to leave requests submitted by staff, and their default settings.
- Length of Workday: Defaults to 7.6 hours, equivalent of a 8 hour shift with a break.
- Start of Workday: The default start time most shifts begin.
- Restrict Leave Request: You can limit the amount of staff that can be booked of on a day before all other requests are rejected.
Click Next to continue.
Setup Confirmation
This area will give you the opportunity to review the selections you’ve made and ensure you’ve set everything up correctly. You can click Back to return to previous screens and make changes if required; you can always go back through this setup and modify options later down the track if need be. Click Next to continue to activation.
Activate
Before enabling the site, you will see if there are any staff members who do not have an email address. At this stage if you notice that there are staff with no login details, head to the Staff area in the top left to update this information on their card.
When you’re ready to activate the Staff Portal and Mobile App:
- Do you wish to enable the site now?
- Yes: Activates the Staff Portal and App, staff will receive an email with instructions.
- No: Will not activate the Staff Portal and app, but will retain the information for later.
- Save Information to update.
Click Finish to complete the setup.
Configuration via Portal
- Visit https://portal.wageloch.com.au/sitesetup
- From the login two options available, select the one that matches your access type:
- You currently log into Wageloch with a username and password.
- When logging into Wageloch on your computer, you have a list of names to pick from and enter your password.
- To proceed through the setup, you’ll need your site username and install code.
- If you do not have this information, please contact Helpdesk.
- You currently log into Wageloch using an email address
- You’ll access Wageloch from an internet browser or desktop icon.
- To proceed through the setup, you’ll need your email address and password.
- You currently log into Wageloch with a username and password.
- Click Next to be prompted for the above credentials and continue.
- From that point onwards, you can follow the setup information from 2.1 onwards aforementioned above to activate the Staff Portal and Mobile App.
Setting up Mobile Clocking

