Budgeting
Using the budgeting tools within Rosters can be extremely useful to find shortfalls in your staffing, if you're spending in excess of an allocated wage cost per roster, and keep track of daily, weekly, fortnightly and individual's costs.
Once your rosters have been created and if you have access to see financial information (see Users & Security), you'll be able to use the following tools effectively to track how much you're planning to spend each roster period.
In this article we'll be talking about checking budgets daily, by staff member, through Grid View and using the Budgets tab.
We'll also cover enabling tools such as maximum wage budgets and maximum department hours.
Should you have question or concerns, please don't hesitate to contact Helpdesk.
Overview
As you're creating your roster, budgets will calculate live as you're adding in staff to shifts. These costings are based off the following information:
- Employee's base hourly rate on their staff card (including Pay Levels).
- Shift times.
- Penalty rates and overtime based on information in your award setup.
- Leave bookings.
The more accurate your shift times and rulings configured in our award interpreter are, the more accurate your estimated wage costings in Budgets will be.
This information is fantastic for comparing your timesheet costs, forecasting future rosters, and generally tracking how much you're spending.
Budgets can also link in with Sales Vs. Wages to compare incoming sales projections vs. wage costs based on your roster budget.
NOTE: If Departments are in use, you can utilize the Department filter to check daily per department.
Budgets Per Day
As you're working through each day, building each roster, entering shifts and staff, you'll see each staff member entered with their shift generate a cost on the far right side. This included the total hours and estimated cost for that shift.
Once you've added everyone in, there's also a calculation in the top left area which indicates your total hours and costs for that day.
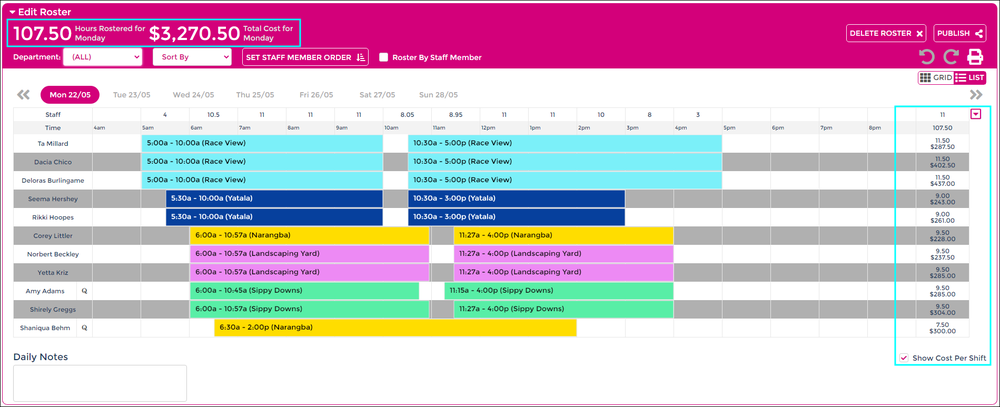
Budgets Per Person
In the pink header bar where you can see your daily costings, there is a small button to Roster by Staff Member.
When enabling this option, it flips the view, displaying employee names across the top, left to right and the days/dates on the left side (top to bottom).
When using this view, you'll now get the estimates rostered hours and cost for the period for that specific person, and the daily cost for each shift on the far right.

Budgets via Roster Tab
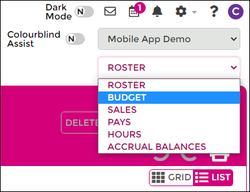
If you're looking for a quick snapshot of costs per person, per day, per week (and fortnight), within the roster there is a drop menu in the top right.
This will currently say ROSTER; if you click it you can select an option for BUDGETS.
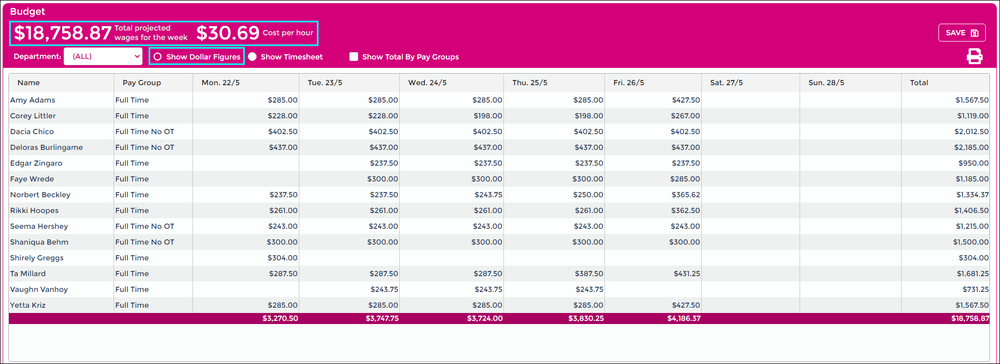
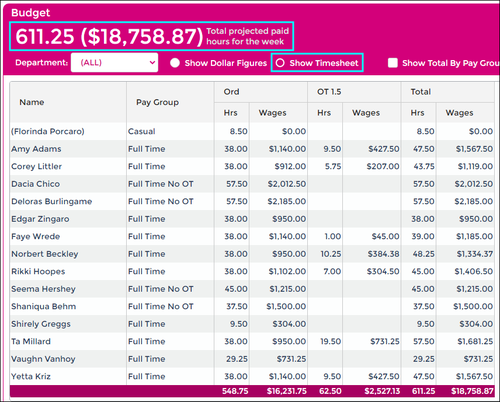
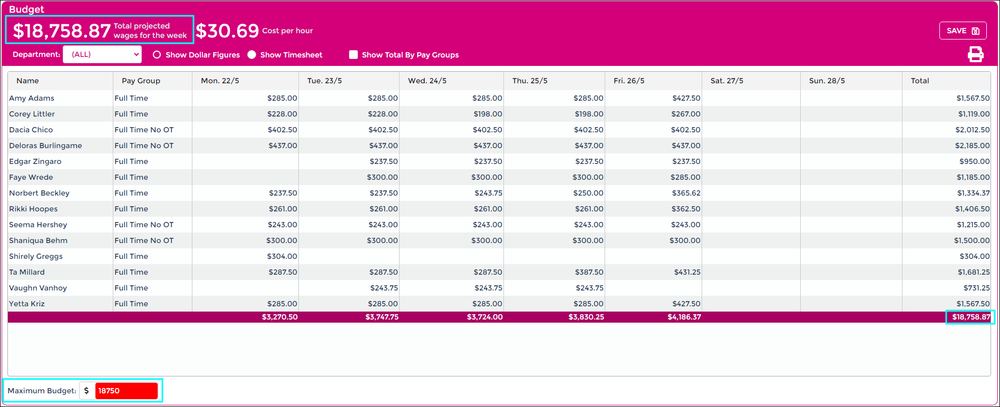
There are two options of how to view these budgets: Show Dollar Figures or Show Timesheet.
- Show Dollar Figures: Gives a simple breakdown of how much the full roster is costing you for each week, day, person and shift.
- Show Timesheet: Will provide a summary of the hours scheduled and how they break down according to your Award Setup.
Budgets via Grid View
Using the Grid View in Wageloch has some serious advantages when it comes to your rosters, even when using it for budgeting purposes. You can see:
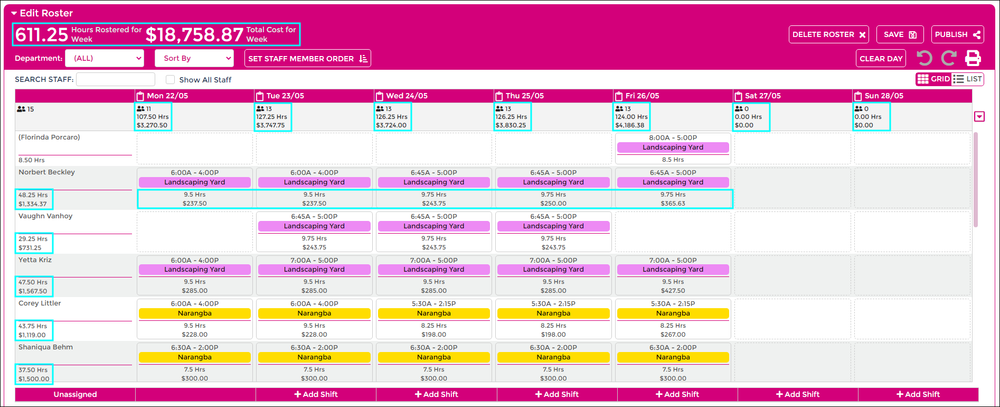
- Costs for the entire period (top left)
- Rosters staff, hours and estimated cost for the day (running along the top, left to right)
- Costs per person for each shift and day (main grid)
- Total estimated hours and wages for each person for the period (left side)
This gives the same information as the Budgets drop menu noted above, but you have the ability to move shifts around in the roster from this view.
To learn how the grid works, please view our Grid View article for more information.
Budgeting Tools
Apart from the general budgeting areas within the system, there are additional functions available to help get more accurate costings on your projected wages.
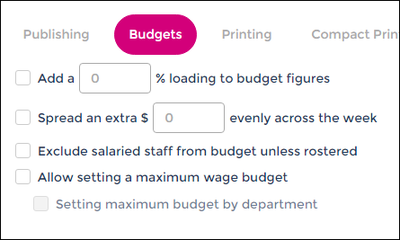
Add ___% loading to budget figures
- All costings in Wageloch are gross wages; before tax, super and deductions.
- Using this loading option enables the ability to add your superannuation contribution (i.e. 10%), or overheads (i.e. 25%)
- Adding a loading onto budgets will visually display the loading in the daily/hourly costings, as well as the total for the week/fortnight.
Spread an extra $___ evenly across the week/fortnight
- Use this tool to add extra cash across the roster period to take into account the possibility of calling staff in, etc.
Exclude salaried staff from budget unless rostered
- Salary staff are set up in Wageloch with a set amount of hours per period (i.e. 38 hours per week, 76 per fortnight, etc.)
- When a blank roster is created, the system will average out the salary employee's hours and total wage over the period.
- Example: $30.00 p/h over a 76 hour fortnight = $2280.00 gross wages / 14 days = $162.85 per day
- Enabling this tool will ignore the salary employee's wages until they're rostered on.
- When you start adding in shifts, the fortnightly wage will average out over the shifts added.
- Example: 6 shifts, 8 hours per day added over a fortnight = $380.00
- The more shifts you add in for a salary employee, the more accurate your costings will be daily.
Allow setting a maximum wage budget
- Enables the function to set a total wage budget in each individual roster.
- If the budget is exceeded, the system will highlight the value in red and provide a prompt when trying to save the roster.
We'll be covering this specific tool below.
Maximum Wage Budget
Setting a maximum wage budget allows you to keep track of your wage spending, making sure the roster is under a certain value, or alerting you if you're spending too much. Being able to have a visual flag to indicate your wages are higher than you want will help curb expenses.
To see these alerts and flags, we need to enable our budgeting tool.
- Click on the Settings cog (top right) and select Rosters from the menu.
- Select the Budgets category.
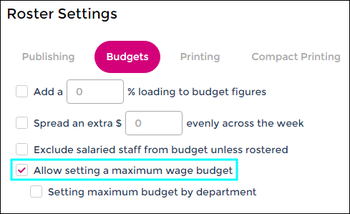
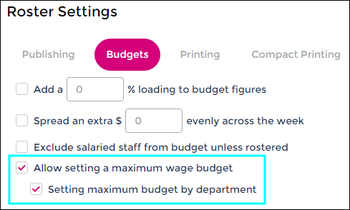
- Tick the box next to Allow setting a maximum wage budget.
- Click Done to save.
To use this budgeting tool, we need to either create a roster, or view a roster that's already created.
- Click on Rosters from the top left menu.
- Click Create New in the top right to start a new roster, or click on a current roster to view.
- Once your roster is open use the ROSTER drop menu in the top right, and select BUDGETS.
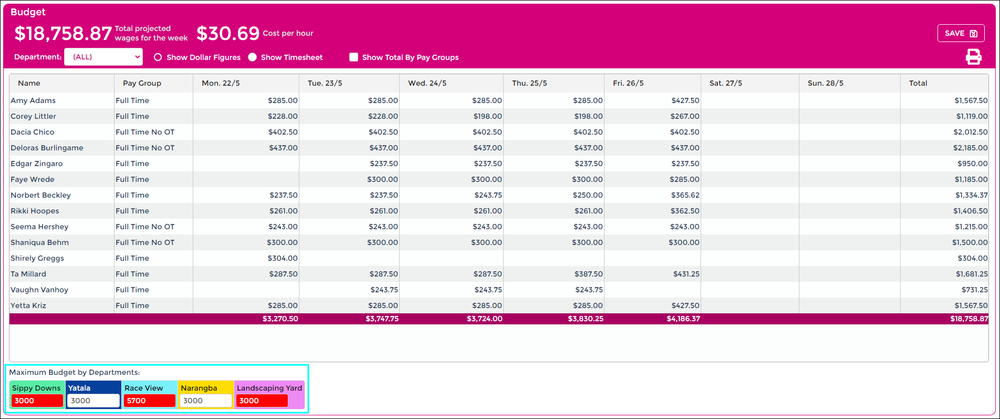
- When your budget has loaded, there is now a Maximum Budget box in the bottom left.
- Enter the total desired cost of your rostered wages.
- If your roster exceeds the value, this box will turn red. When saving you'll receive a prompt.
- If your roster does not exceed the value, everything will remain as normal.
Maximum Wage Budget by Department
Setting a maximum wage budget by department allows you to keep track of your wage spending per department (team, area, job, etc.), which is useful if you're trying to ensure certain areas of your business are not costing too much (or too little!). Being able to have a visual flag to indicate your wages are higher than desired will help understand where your departments may need attention, or gain insight into rostering habits should your department heads be completing rosters on your behalf.
To see these alerts and flags, we need to enable our budgeting tool.
- Click on the Settings cog (top right) and select Rosters from the menu.
- Select the Budgets category.
- Tick the box next to Allow setting a maximum wage budget.
- Tick the box next to Setting maximum budget by department
- Click Done to save.
To use this budgeting tool, we need to either create a roster, or view a roster that's already created.
- Click on Rosters from the top left menu.
- Click Create New in the top right to start a new roster, or click on a current roster to view.
- Once your roster is open use the ROSTER drop menu in the top right, and select BUDGETS.
- When your budget has loaded, there are now a Maximum Budget boxes in the bottom left under each department name.
- Enter the total desired cost of your rostered wages for each department.
- If your roster exceeds the value, this box will turn red. When saving you'll receive a prompt.
- If your roster does not exceed the value, everything will remain as normal.
Maximum Hours by Department
Unlike the options above, perhaps your rosters and their "budgeting" relies more on available hours to allocate, rather than dollar figures.
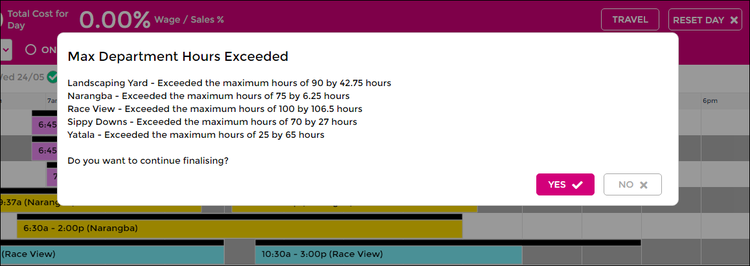
We recently introduced a tool for Maximum Department Hours, which allows you to set the cap of hours available for rostering, but also applying this cap in the timesheets as well.
- Departments must be enabled and in use for this tool to be available.
- Prompts will appear upon saving the roster or finalizing timesheets if the hours cap has been exceeded
- If the department doesn't have a cap, you don't need to enter one.
- Click on the Settings cog (top right) and select Departments from the menu.
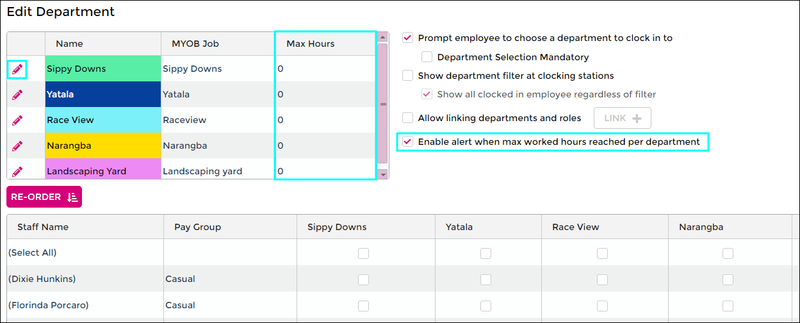
- In the list of optional settings (tick boxes, center right) tick Enable alert when max worked hours reached per department.
- In your department list on the left, you should see a column appear for Max Hours.
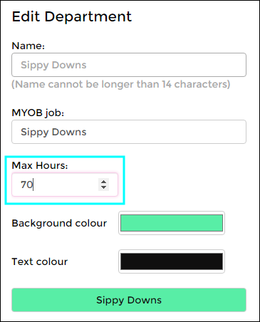
- Click the pencil icon to edit the department; you'll see a Max Hours field.
- Enter the maximum amount of hours you require, and click Done to save.
- Complete this for each department as needed.
- Click Done on the Department home screen to save.
- Click on Rosters from the top left menu.
- Click Create New in the top right to start a new roster, or click on a current roster to view.
- Upon saving and/or publishing your roster, you will receive a prompt if you've exceeded the maximum allocated hours for any department.
- If you're using the department filter (top left) there is a text line in the pink bar showing your maximum hours.
- This option is useful if users have departmental restriction and are taking care of their own team's rosters.

When finalizing your timesheets:
- Upon finalizing a timesheet day, you will receive a prompt if you've exceeded the maximum allocated hours for any department.
- This gives you an opportunity to discover why so many hours have been used, or if any staff need to be reallocated between departments.
Budget Reports
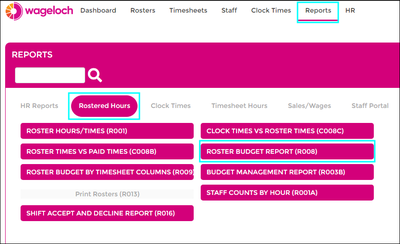
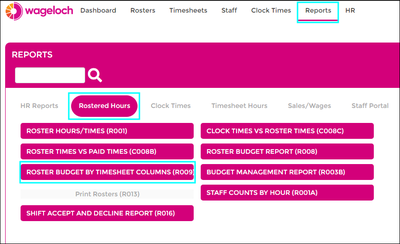
Budget reports are used to pull the information found in the Budgets tab into a spreadsheet format for a "hard copy" or further analysis. There are two reports available based off the Show Dollar Figures or Show Timesheet options:
- Roster Budget Report (R008)
- Roster Budget by Timesheet Columns (R009)
Roster Budget Report
- Click the Reports tab from the top menu.
- Select the Rostered Hours category.
- Click Roster Budget Report (R008)
- Select Period: Pick the roster period or date range to run the report for.
- Display Preferences: Grouping by Department allows you to keep each department's budgets groups together and totalled.
- Department Filter: Pick specific departments to run the report for; to see all, just skip.
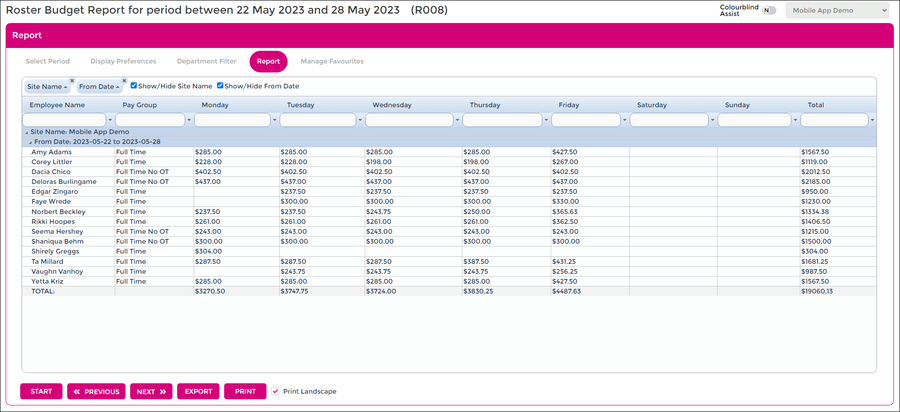
- The Report: Shows you the cost per person, per day, per week and total for the period.
Use the Export button at the bottom left to download a spreadsheet.
Roster Budget by Timesheet Columns
- Click the Reports tab from the top menu.
- Select the Rostered Hours category.
- Click Roster Budget by Timesheet Columns (R009)
- Select Period: Pick the roster period or date range to run the report for.
- Display Preferences: Options for showing or hiding information and sorting by name type is available.
- Staff Filter: You can enable Filter by Staff if you're wanting this report for particular employees.
- Timesheet Display Preferences: Additional options for showing/hiding information, the ability to use days that have been finalized in the timesheet, grouping by department and including paid values or data from incomplete timesheets that have yet to be paid.
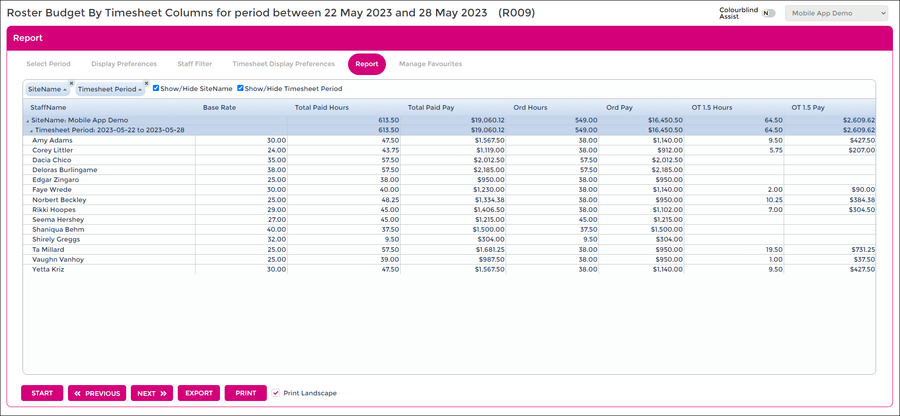
- The Report: Will break down the roster information according to your award information, including penalty rates, overtime, leave, etc.
- On the sample below, Show Paid Values on the Timesheet Display Preferences tab has been enabled.
Use the Export button at the bottom left to download a spreadsheet.
