Difference between revisions of "Departments & Roles"
| Line 24: | Line 24: | ||
* Click on Settings in the top right corner and Select Departments from the menu.<Br> | * Click on Settings in the top right corner and Select Departments from the menu.<Br> | ||
* Click Create | * Click Create<br> | ||
[[File:8.0 Click Settings and Departments.png|300px]] [[File:3.0 Click on Create +.png|380px]] | |||
* Give the department a name and assign it a colour; this will appear in the rosters and timesheets. | * Give the department a name and assign it a colour; this will appear in the rosters and timesheets. | ||
* Continue to create as many departments as required. | * Continue to create as many departments as required.<Br> | ||
[[File:3.0 Click on Name and Colour.png|350px]] | |||
<br> | <br> | ||
| Line 37: | Line 39: | ||
* Once complete, click Done to save. | * Once complete, click Done to save. | ||
Your rosters and timesheets will now be colour coded!<br> | Your rosters and timesheets will now be colour coded!<br> | ||
[[File:3.0 Tick Multiple Areas.png|700px]] | |||
==Why use Roles?== | ==Why use Roles?== | ||
Revision as of 06:25, 7 February 2023
Why use Departments?
Departments are an optional tool in Wageloch that can assist with your rosters, timesheets and reports. We also have the ability to restrict certain administrative users in Wageloch to see specific departments; great for line managers to assist with rostering and timesheets.
There are a lot of different reasons why departments can be useful for you:
- Able to ensure correct staff count and shift coverage.
- Better shift allocation for effective roster forecasting
- Staff will know where in the company they'll be working each shift.
- Ability to run reports and filter by specific departments
- Useful for running reports based on departments for specific wage costings.
Enabling Departments
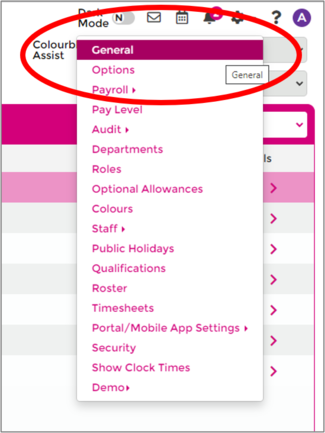
- Click on Settings in the top right corner and select General from the menu
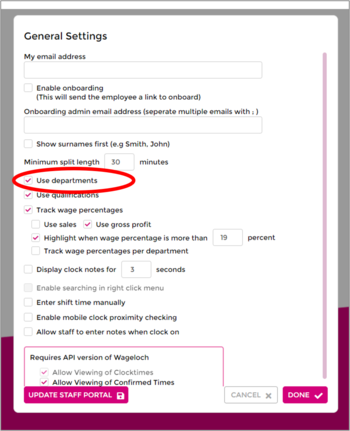
- Enable the Use Departments function.
- Done to save.
Creating and Assigning Staff to Departments
Once you've enabled departments, you can now create them! You're able to make as many as you want, and we can also enable the ability to use them with job codes, tracking categories or classes (speak to Helpdesk for further assistance)
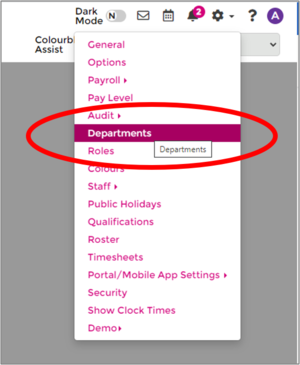
- Click on Settings in the top right corner and Select Departments from the menu.
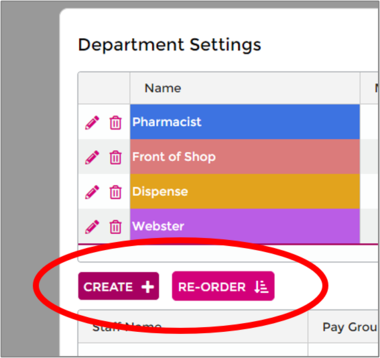
- Click Create
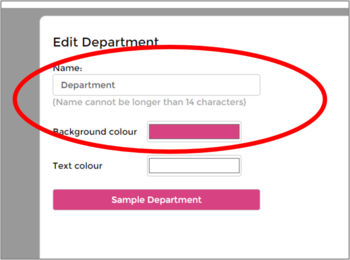
- Give the department a name and assign it a colour; this will appear in the rosters and timesheets.
- Continue to create as many departments as required.
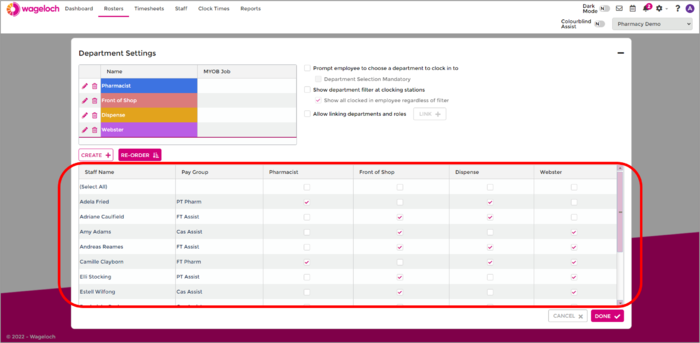
- Once your departments are created, you can now assign staff.
- There should be a list of staff and a series of tick boxes for the departments you've created.
- Tick your employees into their respective departments; if they can work across multiple, tick them!
- Once complete, click Done to save.
Your rosters and timesheets will now be colour coded!
Why use Roles?
Roles are not always needed, and can be used with/without Departments.
Utilizing roles withing Wageloch can be extremely practical for a variety of purposes:
- Ability to forecast what job or role someone is completing on a day within the roster.
- Staff can see on roster what job they'll be completing that shift
- Flexible assignment within the timesheet for reporting
- Assists with job costing reports and can be linked to payroll job codes/classes/tracking categories.
How to Create and Use Roles
- Click Settings and select Roles from the menu
- Click Create
- Give the role a name and assign a color
- Done to create
- Repeat for however many roles you require.
Difference between System Role and User Role
A system role is created in the award Wageloch manually programs into the system for you, based on information you have provided to us.
When assigned to a shift, a system role will change how an employee is paid. This could be a leave type (Annual, Personal, LWOP, etc.) or an alternative role that attracts a different rate of pay (Higher Duties, Supervisor, etc.).
A user role can be created by you, or anyone within your company who has access to Wageloch for rostering.
User roles do not change how an employee is paid, but is rather a visual indicator in the roster or timesheet for a specific job or role that is/was completed on the shift.
Department and Role Linking
Department and Role linking is a fantastic tool to help keep your roles specific to their relative departments. This can be helpful if some departments have a range of roles/jobs they do, and you do not need these roles to be visible for other departments.
Let's use hospitality as an example.
- We have two departments: Back of House (BOH) and Front of House (FOH)
- Chef, Line Cook and Kitchenhand belong to BOH
- Host, Wait Staff, Bar, Cashier belong to FOH.
- We don't want to see the BOH roles for FOH, and vice versa.
After we have created our departments and roles, we now want to link our roles to their respective departments.
- Click Settings and select Departments.
- Tick Allow linking departments and roles
- Click the Link button
- On the left you'll see your departments, on the right your roles.
- Click Select on the department you want to assign roles to.
- Tick the boxes for the roles you want to link.
- Click Select next to the department again to finalize the assignment.
Example:
- Select BOH
- Tick Chef, Line Cook, Kitchenhand.
- Select BOH again; there should now be 3 linked roles.
- Select FOH
- Tick Host, Wait Staff, Bar, Cashier.
- Select FOH again; there should now be 4 linked roles.
- Click Done to save.
- When you're back on the Departments screen, click Done to save.
Using Departments or Roles for Payroll Costing Journals
Depending on the payroll system you use, we may have the ability to link your Roles and/or Departments to:
- MYOB Job Codes
- Reckon Job Classes
- Xero Tracking Categories
- Cost Centres
Thankfully setting up Departments or Roles to be linked to these costings section of your payroll is extremely simple, regardless of which option.
- Click on the Settings cog and select Payroll >> Connections.
- Under the Option category, you should see an option to Assign Job Codes, Classes or tracking categories.
- Pick to set them to either by Department or by Role.
- Done to save.
If you're linking departments to these codes:
- Click on Settings and select Departments from the menu.
- Create the department or click the pencil icon next to the department to edit
- Enter in the code and click Done to save.
- Complete this for each department.
- Once finished, click Done.
If you're linking roles to these codes:
- Click on Settings and select Roles from the menu
- Crate the Role or click the pencil icon next to the role to edit.
- Enter in the code and click Done to save.
- Complete this for each role.
- Once finished, click Done.
