|
|
| Line 38: |
Line 38: |
| Once you've created a user, you'll see a series of tick boxes and some basic column headings as to what they're related to. While some of them are understandable (Access reports, edit staff list) not all of them are self explanatory.<br> | | Once you've created a user, you'll see a series of tick boxes and some basic column headings as to what they're related to. While some of them are understandable (Access reports, edit staff list) not all of them are self explanatory.<br> |
|
| |
|
| See further down on the page for more information about the permissions you're able to grant new users.
| | Click the thumbnail to the right to see the list of permissions. |
|
| |
|
| {| class="wikitable" style="width: 75%;"
| | [[File:Permissions Thumb.PNG|500px|thumb|right]] |
| ! style="color:black; background-color:#d30070" | '''PERMISSION'''
| |
| ! style="color:black; background-color:#e49cc5" | '''DESCRIPTION'''
| |
| |-
| |
| ! style="color:black; background-color:#e6e2e4" | '''SITE'''
| |
| | Shows the name of each site that you are able to grant access to
| |
| |-
| |
| ! style="color:black; background-color:#e6e2e4" | '''ALLOW'''
| |
| | If you have multiple sites, this will show a list - tick Allow for those which you wish to give this user access to. If you do not tick the Allow box, the user will not have access to the system.
| |
| |-
| |
| ! style="color:black; background-color:#e6e2e4" | '''ADMINISTRATOR'''
| |
| | Ticking Administrator will give the user full access to all aspects of Wageloch.
| |
| |-
| |
| ! style="color:black; background-color:#e6e2e4" | '''SEE FIN.'''
| |
| |See Fin. will allow the user to see dollar figures, including staff hourly rates, roster and timesheet budget calculations, and reports.
| |
| |-
| |
| ! style="color:black; background-color:#e6e2e4" | '''SEE ADMIN'''
| |
| |See Admin will allow the user to see Admin Rates only - this is linked to hiding staff rates on individual staff cards.
| |
| |-
| |
| ! style="color:black; background-color:#e6e2e4" | '''MODIFY ROSTERS'''
| |
| |Allows user to create, edit and publish rosters to staff.
| |
| |-
| |
| ! style="color:black; background-color:#e6e2e4" | '''UNFINALISE ROSTERS'''
| |
| |We have an option to enable the locking of rosters - this allows this user to unlock rosters if this function is enabled.
| |
| |-
| |
| ! style="color:black; background-color:#e6e2e4" | '''SUBMIT TIMESHEETS'''
| |
| |Allows the users to export timesheets to your nominated payroll system or submit to head office for processing.
| |
| |-
| |
| ! style="color:black; background-color:#e6e2e4" | '''COMPLETE END OF DAY'''
| |
| |This allows the user to finalise your timesheet days with no ability to make modifications or changes.
| |
| |-
| |
| ! style="color:black; background-color:#e6e2e4" | '''MODIFY END OF DAY'''
| |
| |Allows the modification of shifts in the timesheet.
| |
| |-
| |
| ! style="color:black; background-color:#e6e2e4" | '''REVIEW CONFIRMED DAYS'''
| |
| |Allows the ability to unfinalise and edit timesheet days after they've been finalised.
| |
| |-
| |
| ! style="color:black; background-color:#e6e2e4" | '''MODIFY STAFF LIST'''
| |
| |Grants the user permission to edit staff information in the Staff list.
| |
| |-
| |
| ! style="color:black; background-color:#e6e2e4" | '''PROCESS PAYROLL'''
| |
| |This is only relevant to sites with a Central login - this allows bulk exporting to payroll systems for multiple locations.
| |
| |-
| |
| ! style="color:black; background-color:#e6e2e4" | '''ACCESS SETUP IN ROSTER'''
| |
| |Gives access to the Rosters area in the Settings menu.
| |
| |-
| |
| ! style="color:black; background-color:#e6e2e4" | '''SHOW SALES'''
| |
| |Will show sales percentages but will not display dollar figures if See Fin has been disabled.
| |
| |-
| |
| ! style="color:black; background-color:#e6e2e4" | '''MODIFY CLOCK TIMES'''
| |
| |Gives permission for the user to add in manual clock times.
| |
| |-
| |
| ! style="color:black; background-color:#e6e2e4" | '''ACCESS LEAVE'''
| |
| |Allows the user to create, approve, cancel, edit any leave or availability requests.
| |
| |-
| |
| ! style="color:black; background-color:#e6e2e4" | '''ASSIGN DEPARTMENTS'''
| |
| |Should departments be in use to assist with your rostering, this allows the user to access Settings >> Departments and assign staff.
| |
| |-
| |
| ! style="color:black; background-color:#e6e2e4" | '''ACCESS REPORTS'''
| |
| |Provides access to the Reports area of the top menu.
| |
| |-
| |
| ! style="color:black; background-color:#e6e2e4" | '''DEPARTMENTS'''
| |
| |Allows you to restrict user visibility to departments (i.e. user can see departments 3 and 5, but not 1,2 or 4). | |
| |- | |
|
| |
|
| ==Editing User Details and Permissions== | | ==Editing User Details and Permissions== |
In Wageloch, it is imperative to ensure that any users have the right level of access to the functions they need. In this article, we'll be discussing how to create a new user, set permissions/restrictions and deleting users.
Creating someone as a full administrative user when they do not need that level of access could cause information security concerns - we'll be addressing this in the permissions/restrictions section of this article and why it's important to set the user access correctly.
If after reading this information you still have questions, please contact Helpdesk.
Adding New Users
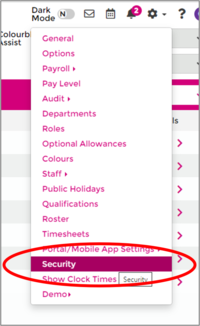
- Click the Settings cog in the top right corner
- Select Security from the menu options.


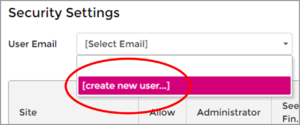
- To create a new user, click on the User Email dropdown menu and select [create new user…]
- Type in the user’s best email address twice and click Apply.


- You will now see a series of tick boxes which either permit or restrict access.
- Note: You must Allow Access and click Save to use the check boxes.

- Go through the different permissions and set what you would like this user to see, do and have access to (see bottom of article for list of permissions).
- When finished, click Save and then Close.

First Time Login
- Open your internet browser (Chrome, Edge, Firefox, Safari, etc.)
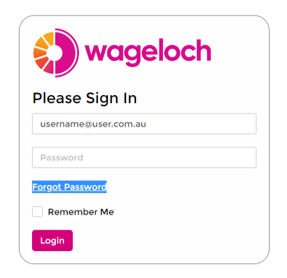
- Visit https://app.wageloch.com.au.
- Enter your email address and click Forgot Password.
- You will now be sent an email that will let you set a password.
- Once your password is set meeting the minimum requirements, you should now be able to log in.

Setting Permissions and Restrictions
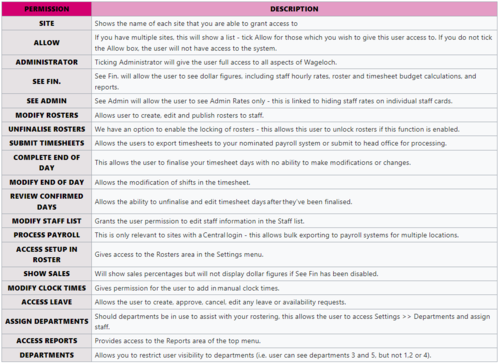
Once you've created a user, you'll see a series of tick boxes and some basic column headings as to what they're related to. While some of them are understandable (Access reports, edit staff list) not all of them are self explanatory.
Click the thumbnail to the right to see the list of permissions.
Editing User Details and Permissions
- Click the Settings cog in the top right corner
- Select Security from the menu options.
- In the user email dropdown, select the user you wish to modify.
- You can Change Email to update their email address to a new one
- Permissions can now be ticked/unticked to change access.
- Once you've made your changes, click Save to update and Close to exit.
Deleting Users
- Click the Settings cog in the top right corner
- Select Security from the menu options.
- In the user email dropdown, select the user you wish to delete.
- Once selected, click Delete.
- Confirm the prompt and the user will be removed from the system.


