Difference between revisions of "Connecting Wageloch to MYOB Advanced"
From Wageloch Wiki
| Line 1: | Line 1: | ||
Once your company file is | Once your company file is configured correctly and ready to link, you will need to authenticate Wageloch with the MYOB Advanced company file. | ||
Completing the connection process is fairly simple, and should only need to be completed once. | Completing the connection process is fairly simple, and should only need to be completed once. | ||
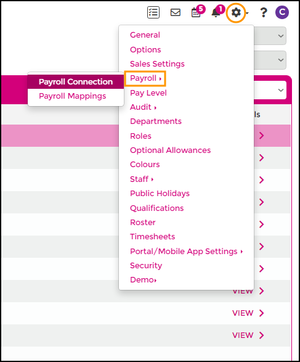
* Open <b>https://app.wageloch.com.au</b> and go to <b>Settings >> Payroll >> Connection.</b> | * Open <b>https://app.wageloch.com.au</b> and go to <b>Settings >> Payroll >> Connection.</b> | ||
| Line 6: | Line 8: | ||
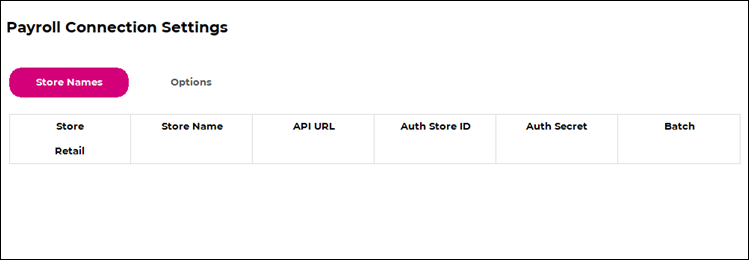
* You will be presented with a screen requesting MYOB Advanced information. | * You will be presented with a screen requesting MYOB Advanced information. | ||
[[File:Settings-payroll-connection.png]] [[File:MYOBAD-connection-settings.png]] | |||
[[File:Settings-payroll-connection.png|300px]] [[File:MYOBAD-connection-settings.png]] | |||
To obtain these details, we need to add Wageloch as a Connected Application through MYOB Advanced. | To obtain these details, we need to add Wageloch as a <b>Connected Application</b> through MYOB Advanced. | ||
* Open <b>MYOB Advanced</b> in a web browser and sign in. | * Open <b>MYOB Advanced</b> in a web browser and sign in. | ||
* Copy the URL in your address bar at the top of the page into a notepad document or similar, removing any text after ".com" | * Copy the URL in your address bar at the top of the page into a notepad document or similar, removing any text after ".com" | ||
** You should have a URL that looks like this: | ** You should have a URL that looks like this: | ||
[[File:URL.png]] | |||
Now you're signed in to MYOB Advanced, we will need to create a set of API credentials. | |||
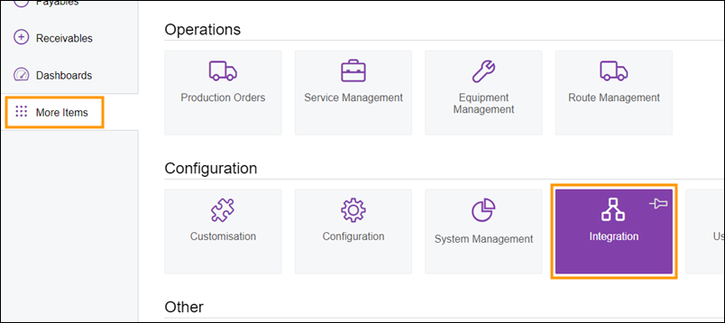
* Go to <b>More Items</b> from the left menu and select <b>Integration >> Connected Applications.</b> | * Go to <b>More Items</b> from the left menu and select <b>Integration >> Connected Applications.</b> | ||
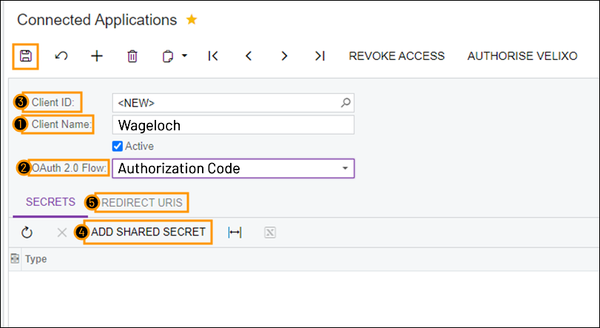
* You will then be presented with | * You will then be presented with fields for Client ID, Client Name, OAuth 2.0 Flow. | ||
* Fill the fields out as follows: | * Fill the fields out as follows: | ||
| Line 31: | Line 31: | ||
* Click the <b>Save</b> icon <i>(floppy disk, top left)</i> | * Click the <b>Save</b> icon <i>(floppy disk, top left)</i> | ||
* Once saved, the <b>Client ID</b> field will populate with a generated Client ID; copy and paste this into a notepad document. | * Once saved, the <b>Client ID</b> field will populate with a generated Client ID; copy and paste this into a notepad document. | ||
[[File:Myob-advanced-connections.png|725px]] [[File:MYOBAD-connected-apps.png|600px]] | |||
* Click on <b>Add Shared Secret</b>, and a new window will be displayed as follows. | |||
* In the <b>Description</b> field, type <b>Wageloch</b> | * In the <b>Description</b> field, type <b>Wageloch</b> | ||
* Copy the text in the <b>Value</b> field and paste it into your notepad document. | * Copy the text in the <b>Value</b> field and paste it into your notepad document. | ||
* Click OK. | * Click OK. | ||
[[File:MYOBAD-shared-secret.png|675px]] | |||
* You'll be taken back to the <b>Connected Applications</b> window. | * You'll be taken back to the <b>Connected Applications</b> window. | ||
* Click on the <b>Redirect URIS</b> tab and paste the following API link into the field next to the asterisk: <b>https://apiroute.wageloch.com.au/myobadvanced<b> | * Click on the <b>Redirect URIS</b> tab and paste the following API link into the field next to the asterisk: <b>https://apiroute.wageloch.com.au/myobadvanced</b> | ||
* Click the Save icon in MYOB. | * Click the <b>Save</b> icon in MYOB. | ||
[[File:MYOBAD-connected-apps.png|675px]] | |||
* Go back to Wageloch where your MYOB Advanced Settings window should still be up. | |||
* Get your notepad document ready! | |||
* Fill out each field with the information from the notepad as follows: | |||
** <b>Store Name:</b> Can be anything, but it must contain something | |||
** <b>API URL:</b> https://yourbusinessnamehere.myobadvanced.com | |||
** <b>Client ID:</b> The Client ID you copied from the Connected Applications window in MYOB Advanced | |||
** <b>Client Secret:</b> The value you copied from the Add Shared Secret window in MYOB Advanced. | |||
[[File:MYOB-Advanced-Credentials.png|600px]] | |||
* Click on the <b>Link to MYOB</b> button. | |||
* You will asked to finish authorizing Wageloch to have access to MYOB Advanced. | |||
* Click on <b>Yes, Allow</b> and close the tab. | |||
[[File:MYOBAD-auth.png|675px]] | |||
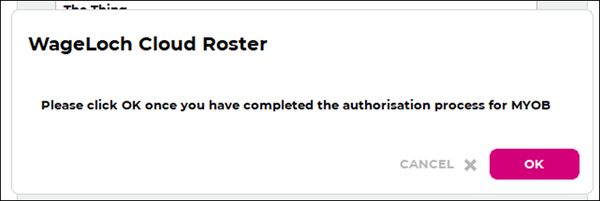
* Click OK to confirm the MYOB authorization is complete. | |||
* You should now see your MYOB Advanced file is connected! | |||
* Click Done to finish. | |||
[[File:MYOBAD-auth-complete.png|600px]] [[File:MYOBAD-connection-fin.png|750px]] | |||
Revision as of 04:32, 8 November 2023
Once your company file is configured correctly and ready to link, you will need to authenticate Wageloch with the MYOB Advanced company file.
Completing the connection process is fairly simple, and should only need to be completed once.
- Open https://app.wageloch.com.au and go to Settings >> Payroll >> Connection.
- Click on the Store name to open the configuration window.
- You will be presented with a screen requesting MYOB Advanced information.
To obtain these details, we need to add Wageloch as a Connected Application through MYOB Advanced.
- Open MYOB Advanced in a web browser and sign in.
- Copy the URL in your address bar at the top of the page into a notepad document or similar, removing any text after ".com"
- You should have a URL that looks like this:
Now you're signed in to MYOB Advanced, we will need to create a set of API credentials.
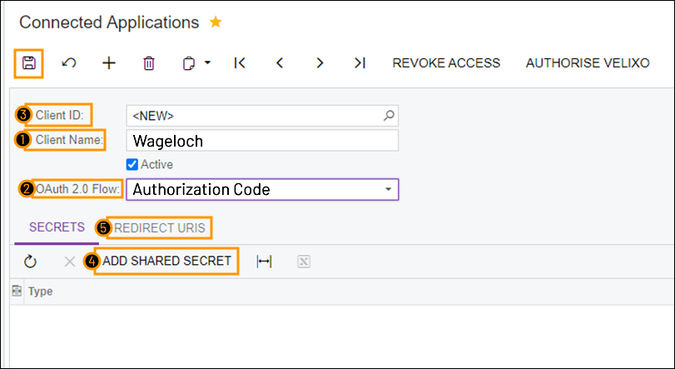
- Go to More Items from the left menu and select Integration >> Connected Applications.
- You will then be presented with fields for Client ID, Client Name, OAuth 2.0 Flow.
- Fill the fields out as follows:
- Client Name: Wageloch
- OAuth 2.0 Flow: Authorization Code
- Click the Save icon (floppy disk, top left)
- Once saved, the Client ID field will populate with a generated Client ID; copy and paste this into a notepad document.
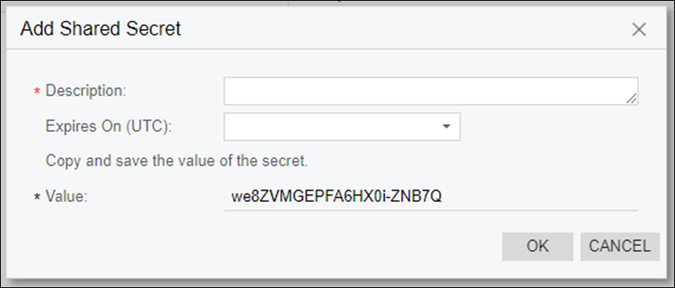
- Click on Add Shared Secret, and a new window will be displayed as follows.
- In the Description field, type Wageloch
- Copy the text in the Value field and paste it into your notepad document.
- Click OK.
- You'll be taken back to the Connected Applications window.
- Click on the Redirect URIS tab and paste the following API link into the field next to the asterisk: https://apiroute.wageloch.com.au/myobadvanced
- Click the Save icon in MYOB.
- Go back to Wageloch where your MYOB Advanced Settings window should still be up.
- Get your notepad document ready!
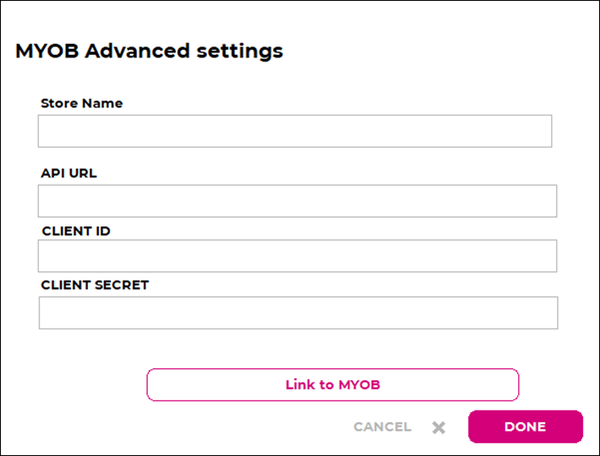
- Fill out each field with the information from the notepad as follows:
- Store Name: Can be anything, but it must contain something
- API URL: https://yourbusinessnamehere.myobadvanced.com
- Client ID: The Client ID you copied from the Connected Applications window in MYOB Advanced
- Client Secret: The value you copied from the Add Shared Secret window in MYOB Advanced.
- Click on the Link to MYOB button.
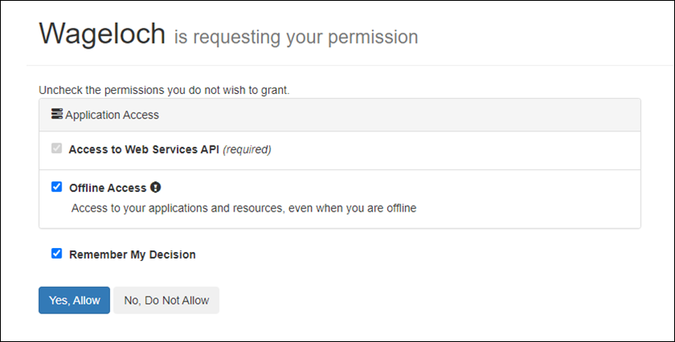
- You will asked to finish authorizing Wageloch to have access to MYOB Advanced.
- Click on Yes, Allow and close the tab.
- Click OK to confirm the MYOB authorization is complete.
- You should now see your MYOB Advanced file is connected!
- Click Done to finish.
Currently in development
This article will eventually contain information about how to:
- Add Wageloch as a connected application
- Obtain your Client ID and Client Secret
- Authorize access for Wageloch to your company file
