Difference between revisions of "Leave Templates"
From Wageloch Wiki
| Line 21: | Line 21: | ||
* Select how long the template will be for (1 week/fortnight, etc.) | * Select how long the template will be for (1 week/fortnight, etc.) | ||
* Done to save. | * Done to save. | ||
<br> | |||
[[File: 1.1 Other Enable Leave Template.png|600px]] [[File: 1.1 Commencement Date.png|517px]] | |||
[[File: 1.1 Rotation Length.png|600px]] | |||
==Creating the Template== | ==Creating the Template== | ||
Revision as of 03:37, 16 February 2023
Creating leave templates in Wageloch has the benefit of making leave booking easier in the long run, especially if your staff don’t typically work a standard eight-hour shift. This document will outline:
- Creating roster leave templates for all applicable staff entitled to leave
- Same format as a roster
- Includes all employee’s standard hours in bulk
- Can be set in rotations
- Individual leave templates
- Configure leave templates for each employee one at a time
- Only include normal shifts
Roster Leave Template
Enabling the Template
- Open Wageloch and sign in.
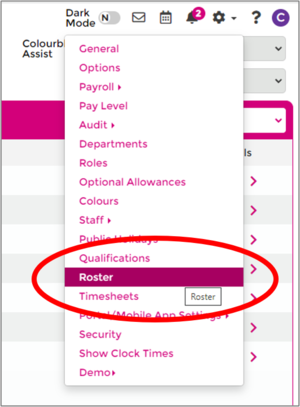
- Click on the Settings cog in the top right
- Select Rosters from the menu.
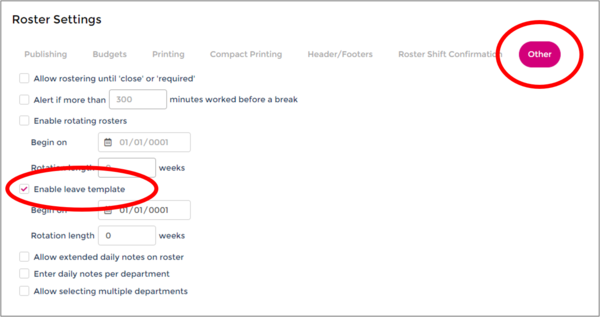
- In the Other section, tick Enable Leave Template.
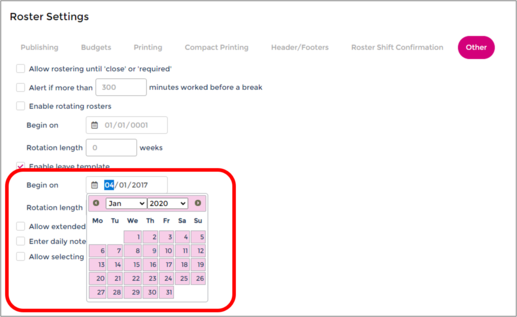
- Pick date when the template will commence (can backdate if needed)
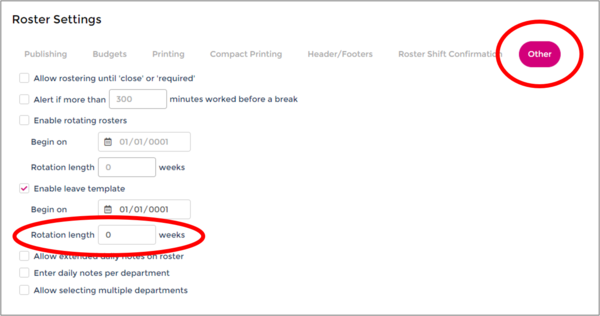
- Select how long the template will be for (1 week/fortnight, etc.)
- Done to save.
Creating the Template
- After enabling the template, click on Rosters in the top left menu.
- In the top right corner in the Rosters drop menu, select Leave Template.
- Select the week/fortnight in question.
- You’ll notice this is the same formatting as a roster, however there are only days, no dates.
- This will ignore roster tools like leave and unavailability.
- You can create your leave template in a few different ways:
- From blank, adding in shifts/staff as you go on the daily mode.
- From blank, switching to Roster by Staff Member to do one person at a time.
- Use the Copy From tool in the bottom right to copy from a previous roster or
another template.
- Once you’ve added in shifts for all the staff eligible for leave, click Save.
- Your Roster Template is now ready to use!
Individual Leave Template
Creating the Template
Please note that you’ll need to ensure the Roster Leave Template is disabled for this to work.
- Click on Staff in the top left menu.
- Select the name of the employee you wish to add the template for.
- Select the Leave category on the staff card.
- Here you can configure the individual leave template in a few different ways:
- Set default length of work day to __ hours
- Create multiple templates for multiple weeks
- Manually add in their shifts if they vary day to day and hours in the shift.
- Be sure to set a date to Start Template from.
- Done to save.
Applying the Leave Template
Portal/Mobile App Requests
- Open Wageloch and sign in
- Click the Leave Calendar icon in the top right.
- Under the Pending Requests category, you should have a pending request.
- Click on the name of the employee.
- When viewing their request, it will automatically appear with a prompt to apply a leave
template.
- Select the leave type you wish to use and click Done to apply.
- Click Save to approve the leave request.
Manual Leave Bookings
- Open Wageloch and sign in
- Click the Leave Calendar icon in the top right.
- Select Calendar from the menu categories.
- Click/drag across the day you wish to book.
- Select the employee name from the list.
- You should see a button Apply Leave Template; click it.
- Select the leave type you wish to use and click Done to apply.
- Click Save to approve the leave request.


