Difference between revisions of "Creating Custom Workflow"
From Wageloch Wiki
(Created page with "Through the Onboarding tab, you’re able to create a custom workflow to help digitise and streamline the sending and receiving of documents like contracts, policies and emplo...") |
|||
| Line 13: | Line 13: | ||
* Click New Template in the top right. | * Click New Template in the top right. | ||
[[File:onboard-new-template.png]] | [[File:onboard-new-template.png|1000px]] | ||
* In the Create Onboarding Template window, give the template a name. | * In the Create Onboarding Template window, give the template a name. | ||
| Line 23: | Line 23: | ||
* Click the tick to save this stage. | * Click the tick to save this stage. | ||
[[File:stage1-ea (2).png]] | |||
[[File:stage1-ea (2).png|500px|right]] | |||
* Click the New Stage button. | * Click the New Stage button. | ||
| Line 31: | Line 33: | ||
* Click the tick to save this stage. | * Click the tick to save this stage. | ||
[[File:stage2-eh.png]] | |||
[[File:stage2-eh.png|500px|right]] | |||
* Click the New Stage button. | * Click the New Stage button. | ||
| Line 39: | Line 43: | ||
* Click the tick to save this stage. | * Click the tick to save this stage. | ||
[[File:stage3-pd.png]] | |||
[[File:stage3-pd.png|500px|right]] | |||
* Click the New Stage button. | * Click the New Stage button. | ||
| Line 47: | Line 53: | ||
* Click the tick to save this stage. | * Click the tick to save this stage. | ||
[[File:stage4-license (1).png]] | |||
[[File:stage4-license (1).png|500px|right]] | |||
* Click the New Stage button. | * Click the New Stage button. | ||
| Line 55: | Line 63: | ||
* Click the tick to save this stage. | * Click the tick to save this stage. | ||
[[File:stage5-certs.png]] | |||
[[File:stage5-certs.png|500px|right]] | |||
* Click the New Stage button. | * Click the New Stage button. | ||
| Line 65: | Line 75: | ||
* Note: You can edit the stages, name or even delete the workflow by using the pencil to edit and bin to delete. | * Note: You can edit the stages, name or even delete the workflow by using the pencil to edit and bin to delete. | ||
[[File:stage6-uniform.png]] | |||
[[File:stage6-uniform.png|500px|right]] | |||
[[File:template-success.png]] | [[File:template-success.png]] | ||
[[File:template-created (1).png]] | [[File:template-created (1).png]] | ||
Revision as of 01:56, 23 June 2023
Through the Onboarding tab, you’re able to create a custom workflow to help digitise and streamline the sending and receiving of documents like contracts, policies and employee handbooks, even requesting uniform sizes with Custom Fields.
In this section we’ll cover how to best set up your workflow using the previous steps of uploading documents and policies, then the process of sending this out to a new employee.
Creating Workflow
You can create multiple workflows depending on your business and onboarding requirements. These workflows are broken into stages to simplify the process and make it easy to fill out.
We’ll be showing how to create a basic workflow that includes document categories, document and policy templates, and Custom Fields.
- Open Wageloch and sign in, using your MFA code.
- Click the HR tab at the top of the screen.
- Select the Onboarding category.
- Click New Template in the top right.
- In the Create Onboarding Template window, give the template a name.
- Please keep Bank Details are Required ticked if you require their banking information during the onboarding process.
- Click the New Stage button.
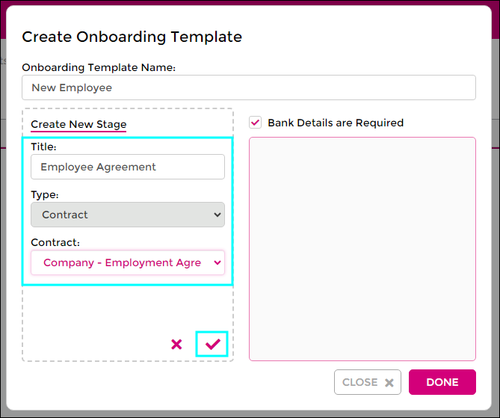
- Title: Give the stage a name, such as Employee Agreement.
- Type: Pick the document category; Contract.
- Contract: Pick the document you wish to send.
- Click the tick to save this stage.
- Click the New Stage button.
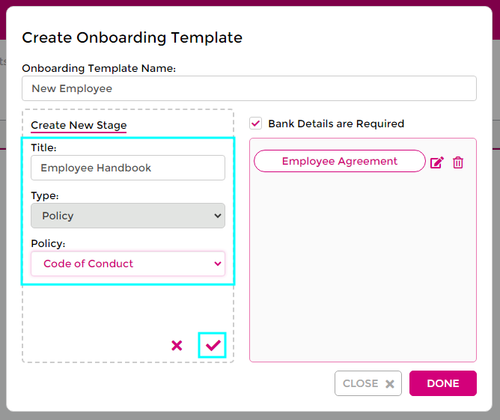
- Title: Give the stage a name; Employee Handbook.
- Type: Pick the document category; Policy.
- Policy: Pick the document you wish to send; Code of Conduct.
- Click the tick to save this stage.
- Click the New Stage button.
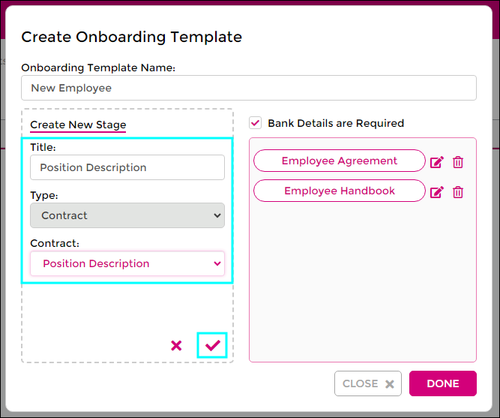
- Title: Give the stage a name; Position Description.
- Type: Pick the document category; Contract.
- Contract: Pick the document you wish to send; Position Description
- Click the tick to save this stage.
- Click the New Stage button.
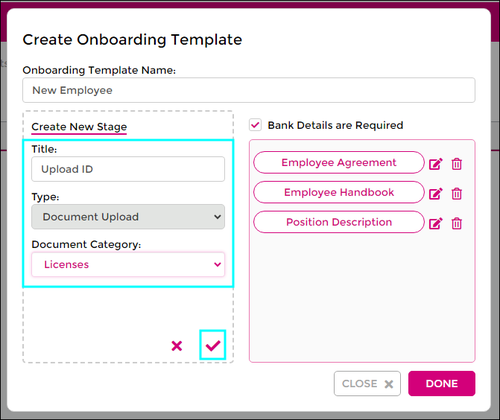
- Title: Give the stage a name; Upload ID
- Type: Pick the document category; Document Upload
- Document Category: Pick the document category that is relevant; Licenses
- Click the tick to save this stage.
- Click the New Stage button.
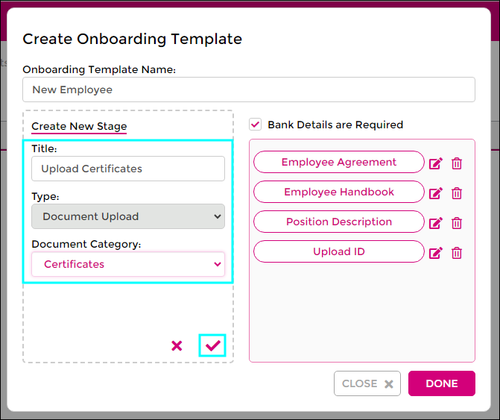
- Title: Give the stage a name; Upload Certificates
- Type: Pick the document category; Document Upload
- Document Category: Pick the document category that is relevant; Certificates
- Click the tick to save this stage.
- Click the New Stage button.
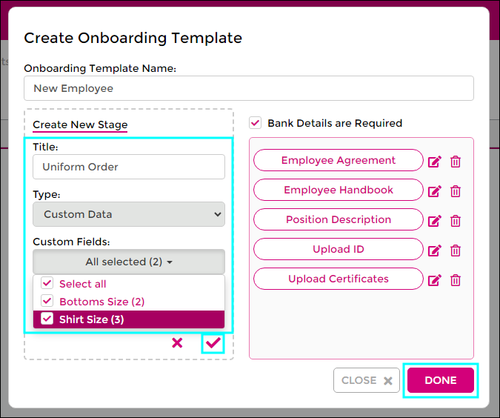
- Title: Give the stage a name; Uniform Order
- Type: Pick the document category; Custom Field
- Custom Fields: Pick the custom fields you’ve created that you’d like to include in this stage; Bottoms Size (2), Shirt Size (3)
- Click the tick to save this stage.
- Click Done to complete your onboarding workflow template.
- Note: You can edit the stages, name or even delete the workflow by using the pencil to edit and bin to delete.

