Difference between revisions of "Completing Timesheets"
| (4 intermediate revisions by the same user not shown) | |||
| Line 5: | Line 5: | ||
==Advanced Timesheets== | ==Advanced Timesheets== | ||
[[File: | [[File:Timesheet-by-dept-new.png|link=Timesheets by Department]] [[File:Time-by-emp-new.png|link=Timesheets by Employee]] [[File:Using-new-calcs-new.png|link=Using View Timesheet Calculations]] [[File:Add-manual-times-new.png|link=Adding_Manual_Clock_Times]] | ||
<br><br> | <br><br> | ||
| Line 97: | Line 97: | ||
* Check that all timesheet days and departments have been checked correctly prior to clicking Pre-Submit again. | * Check that all timesheet days and departments have been checked correctly prior to clicking Pre-Submit again. | ||
===Submitting Timesheet=== | |||
* Clicking Pre-Submit after your timesheet days are finalized will generate a Timesheet Summary for the entire pay period and each staff member. | |||
* You can check all staff hours at once, ensuring that this is breaking down into the right pay categories. | * You can check all staff hours at once, ensuring that this is breaking down into the right pay categories. | ||
* Once you are | * Once you are satisfied the hours and breakdown is correct, click '''Submit''' in the top right. | ||
* This will either send to your payroll system directly for processing, or to your payroll provider for export. | * This will either send to your payroll system directly for processing, or to your payroll provider for export. | ||
---- | ---- | ||
| Line 130: | Line 130: | ||
<br> | <br> | ||
[[File:Back-button-new.png|link=Creating Rosters]] [[File:Home-button-new.png|link=Main Page]] [[File:Next-button-new.png|link=Wageloch Mobile App]] | |||
Latest revision as of 05:02, 9 December 2025
A crucial part of the timesheet creation is ensuring that your days are finalised correctly; this directly assists with making payroll accurate and reduces the time it takes to pay staff.
It is extremely important to make sure that the timesheets are a true representation of the shifts that happened on the day; rosters are always a prediction of what you think will occur, timesheets are your actual happenings.
Should you have any questions, concerns or simply need a bit of guidance, please contact the Wageloch Helpdesk.
Advanced Timesheets
Finalising Timesheets by Roster
- Open Wageloch and sign in.
- Select Timesheets from the top menu.
- Select the current timesheet period to open your active timesheet.
Interpreting your Timesheet
- You’ll be presented with the days of the week(s) for the current cycle.
- Select the day you wish to finalize.
- Next to staff names, you’ll see coloured bars and black bars if rosters are being used
- The black bar is the rostered shift, your shift prediction.
- The coloured bar is the actual shift, which can be modified to reflect what actually happened that day and is what will pay staff.
- You should also see vertical green and red bars at the beginning and end of the shift, indicating the times your employees have clocked in and out for their shift.
Basic Adjustments
- When you are viewing a timesheet day, you can move the colored bar to edit the amount of hours that staff are to be paid.
- For example; If the black roster bar indicates a finish at 6PM but their red clock out time is 7PM, you would left-click and drag out the end of the coloured bar to match the clock time.
- This will pay the employee for an additional hour above what they were rostered.
- If the clock times are a few minutes before and a few minutes after the beginning and end of the shift, you do not need to make any changes.
Assigning Leave and other Roles
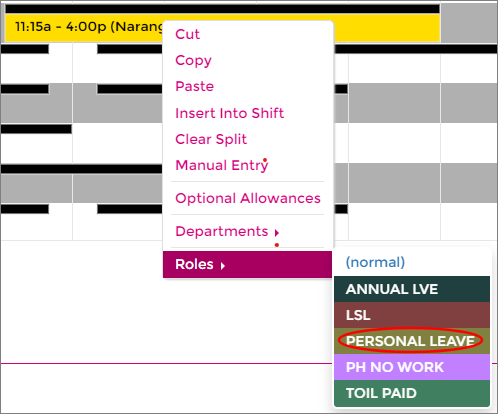
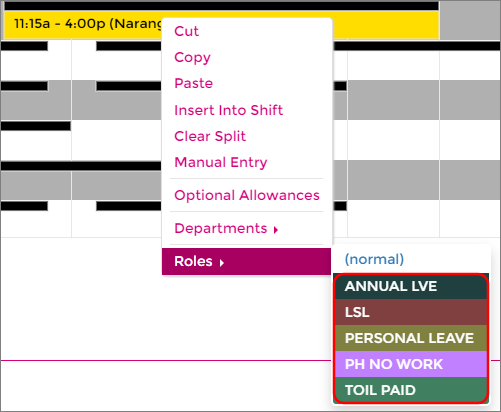
- If a permanent staff member has called in sick for a shift, you need to ensure they are assigned SICK or PERSONAL LEAVE.
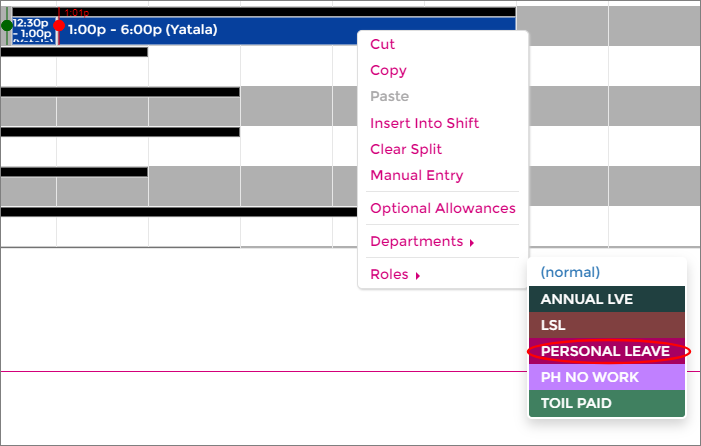
- Right-click on the shift, and assign PERSONAL LEAVE
- You can also assign other leave types such as ANNUAL LEAVE or others depending on your award.
- If this staff member has left partway through their shift, you will need to edit their normal shift and add in SICK LEAVE.
- Note where their clock out time is, i.e. 1130AM and fill this shift with an ordinary shift (left-click and drag).
- Left-click and add in an additional shift to match the rostered bar.
- Right-click on the additional shift and the latter part of the shift to assign PERSONAL LEAVE.
- This will pay ordinary rates for the first part of the shift, then from their sick leave for the rest.
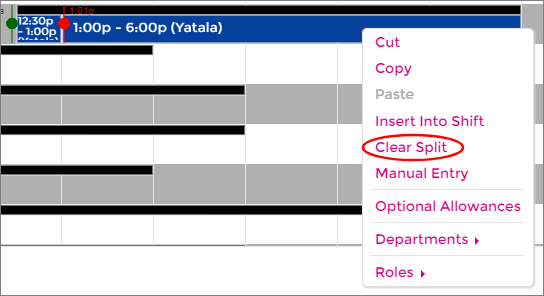
- If they are a casual employee, right-click on the shift and Clear, as they will not get paid.
Finalising your Timesheet
- Once you have adjusted and checked that all the hours are correct, click Finalise in the top right corner.
- This will lock the day from any changes and generates a green tick next to the date to indicate the day is complete.
- You can Unfinalise the day to unlock the timesheet and make changes if required.
- We recommend that either every day or every other day, go into the timesheets and finalise the hours.
- On Tuesday finalise Monday, on Wednesday finalise Tuesday, etc.
- On Wednesday finalise Monday and Tuesday, Friday finalise Wednesday and Thursday, etc.
- Once all of your days have been checked and finalised with green ticks, click Pre-Submit in the lower right.
- If you receive a prompt stating that some departments or days have not been finalised, do not proceed
- Check that all timesheet days and departments have been checked correctly prior to clicking Pre-Submit again.
Submitting Timesheet
- Clicking Pre-Submit after your timesheet days are finalized will generate a Timesheet Summary for the entire pay period and each staff member.
- You can check all staff hours at once, ensuring that this is breaking down into the right pay categories.
- Once you are satisfied the hours and breakdown is correct, click Submit in the top right.
- This will either send to your payroll system directly for processing, or to your payroll provider for export.
Finalising Timesheet by Clock Times
- Open Wageloch and sign in.
- Select Timesheets from the top left menu.
- Select the current timesheet period to open your active timesheet.
Interpreting your Timesheet
- You’ll be presented with the days of the week(s) for the current cycle.
- Select the day you wish to finalize.
- Next to staff names, ideally you’ll see both coloured bars and clock in/out times.
- The coloured bar is the actual shift, which can be modified to reflect what actually happened that day.
- The coloured bar will only populate if employees have clocked in/out for their shift.
- You should also see vertical green and red bars at the beginning and end of the shift, indicating the times your employees have clocked in and out for their shift.
IMPORTANT: If staff forget to clock in and/or clock out, their clock times will be visible on the timesheet, however the coloured bar that will pay them will not be present. You must manually left-click and drag this in. Failure to do so will result in pay discrepancies.
For all other steps, please refer to the previously mentioned sections above for Basic Adjustments, Assigning Leave and Finalising Your Timesheet.


