Difference between revisions of "Users & Security"
(Created page with "In Wageloch, it is imperative to ensure that any users have the right level of access to the functions they need. In this article, we'll be discussing how to <b>create a new u...") |
|||
| (27 intermediate revisions by the same user not shown) | |||
| Line 1: | Line 1: | ||
In Wageloch, it is imperative to ensure that any users have the right level of access to the functions they need. In this article, we'll be discussing how to <b>create a new user, set permissions/restrictions</b> and <b> deleting users</b>. | In Wageloch, it is imperative to ensure that any users have the right level of access to the functions they need. In this article, we'll be discussing how to <b>create a new user, set permissions/restrictions</b> and <b> deleting users</b>. We've recently added in <b>[[Multi Factor Authentication]]</b> to add a new layer of security to Wageloch. | ||
Creating someone as a full administrative user when they do not need that level of access could cause information security concerns - we'll be addressing this in the <b>permissions/restrictions<b> section of this article and why it's important to set the user access correctly. | Creating someone as a full administrative user when they do not need that level of access could cause information security concerns - we'll be addressing this in the <b>permissions/restrictions</b> section of this article and why it's important to set the user access correctly. | ||
If after reading this information you still have questions, please contact [https://wageloch.com.au/contact Helpdesk]. | If after reading this information you still have questions, please contact <b>[https://wageloch.com.au/contact Helpdesk].</b> | ||
[[File:Mfa-button-new (1).png|link=Multi Factor Authentication]] | |||
==Adding New Users== | |||
* Click the Settings cog in the top right corner | |||
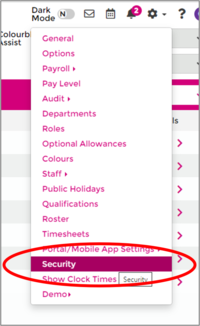
* Select Security from the menu options. | |||
<br>[[File:1.1 Settings.png|300px]] [[File:1.2 Select Security.png|200px]]<br> | |||
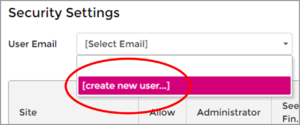
* To create a new user, click on the User Email dropdown menu and select [create new user…] | |||
* Type in the user’s best email address twice and click Apply. | |||
<br>[[File:1.3 User Email.png|300px]] [[File:1.4 Email address and Apply.png|580px]]<br> | |||
* You will now see a series of tick boxes which either permit or restrict access. | |||
** Note: You must Allow Access and click Save to use the check boxes. | |||
<br>[[File:1.5 Allow access.png]]<br> | |||
* Go through the different permissions and set what you would like this user to see, do and have access to (see bottom of article for list of permissions). | |||
* When finished, click Save and then Close. | |||
<br>[[File:1.6 Click Save and Close.png|300px]]<br> | |||
---- | |||
===First Time Login=== | |||
* Open your internet browser (Chrome, Edge, Firefox, Safari, etc.) | |||
* Visit https://app.wageloch.com.au. | |||
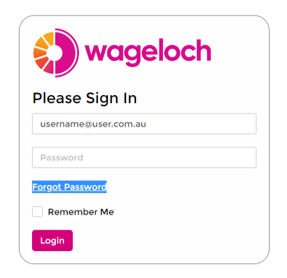
* Enter your email address and click Forgot Password. | |||
* You will now be sent an email that will let you set a password. | |||
* Once your password is set meeting the minimum requirements, you should now be able to log in. | |||
[[File:1.1.1 First Time Login.png|300px]] | |||
==Setting Permissions and Restrictions== | |||
Once you've created a user, you'll see a series of tick boxes and some basic column headings as to what they're related to. While some of them are understandable (Access reports, edit staff list) not all of them are self explanatory.<br> | |||
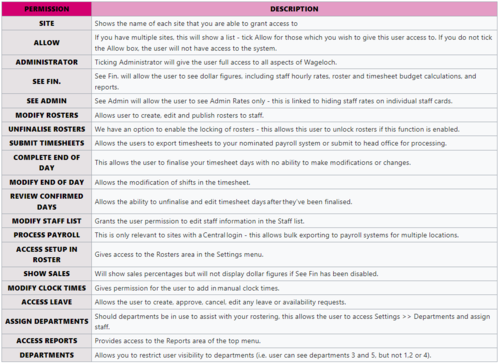
Click the thumbnail to the right to see the list of permissions. | |||
[[File:Permissions Thumb.PNG|500px|thumb|right]] | |||
==Editing User Details and Permissions== | |||
* Click the Settings cog in the top right corner | |||
* Select Security from the menu options. | |||
* In the user email dropdown, select the user you wish to modify. | |||
** You can Change Email to update their email address to a new one | |||
** Permissions can now be ticked/unticked to change access. | |||
* Once you've made your changes, click Save to update and Close to exit. | |||
<br>[[File:4.8.3.1 Click Save and Close.png|300px]]<br> | |||
==Deleting Users== | |||
* Click the Settings cog in the top right corner | |||
* Select Security from the menu options. | |||
* In the user email dropdown, select the user you wish to delete. | |||
* Once selected, click Delete. | |||
* Confirm the prompt and the user will be removed from the system. | |||
<br>[[File:4.1 Click Delete.png|500px]] [[File:4.2 Confirm.png|500px]] | |||
<br> | |||
<br> | |||
<br> | |||
[[File:Home-button-new.png|link=Main Page]] [[File:Next-button-new.png|link=Setting Your Password]] | |||
Latest revision as of 00:58, 1 December 2023
In Wageloch, it is imperative to ensure that any users have the right level of access to the functions they need. In this article, we'll be discussing how to create a new user, set permissions/restrictions and deleting users. We've recently added in Multi Factor Authentication to add a new layer of security to Wageloch.
Creating someone as a full administrative user when they do not need that level of access could cause information security concerns - we'll be addressing this in the permissions/restrictions section of this article and why it's important to set the user access correctly.
If after reading this information you still have questions, please contact Helpdesk.
Adding New Users
- Click the Settings cog in the top right corner
- Select Security from the menu options.
- To create a new user, click on the User Email dropdown menu and select [create new user…]
- Type in the user’s best email address twice and click Apply.
- You will now see a series of tick boxes which either permit or restrict access.
- Note: You must Allow Access and click Save to use the check boxes.
- Go through the different permissions and set what you would like this user to see, do and have access to (see bottom of article for list of permissions).
- When finished, click Save and then Close.
First Time Login
- Open your internet browser (Chrome, Edge, Firefox, Safari, etc.)
- Visit https://app.wageloch.com.au.
- Enter your email address and click Forgot Password.
- You will now be sent an email that will let you set a password.
- Once your password is set meeting the minimum requirements, you should now be able to log in.
Setting Permissions and Restrictions
Once you've created a user, you'll see a series of tick boxes and some basic column headings as to what they're related to. While some of them are understandable (Access reports, edit staff list) not all of them are self explanatory.
Click the thumbnail to the right to see the list of permissions.
Editing User Details and Permissions
- Click the Settings cog in the top right corner
- Select Security from the menu options.
- In the user email dropdown, select the user you wish to modify.
- You can Change Email to update their email address to a new one
- Permissions can now be ticked/unticked to change access.
- Once you've made your changes, click Save to update and Close to exit.
Deleting Users
- Click the Settings cog in the top right corner
- Select Security from the menu options.
- In the user email dropdown, select the user you wish to delete.
- Once selected, click Delete.
- Confirm the prompt and the user will be removed from the system.


