Difference between revisions of "Custom Fields"
| (6 intermediate revisions by the same user not shown) | |||
| Line 1: | Line 1: | ||
Using the Custom Fields section of Wageloch HR allows you to add extra fields into the [[Onboarding Workflow]] or into the Additional Information section within a staff card. | Using the Custom Fields section of Wageloch HR allows you to add extra fields into the <b>[[Onboarding Workflow]]</b> or into the Additional Information section within a staff card. | ||
This could be simple information like "Has the staff member completed orientation?" and a tick to say "yes", or even the ability to list skill sets and tick multiple options. | This could be simple information like "Has the staff member completed orientation?" and a tick to say "yes", or even the ability to list skill sets and tick multiple options. | ||
| Line 24: | Line 24: | ||
Click on any of the images to see a larger screen shot. | Click on any of the images to see a larger screen shot. | ||
* All custom fields must be given a Name. | |||
* Select the Type of field you wish to create (see all variables below) | |||
* Select whether it is a mandatory requirement to provide a response. | |||
| Line 30: | Line 34: | ||
!colspan="2" style="width: 50%| Number | !colspan="2" style="width: 50%| Number | ||
|- | |- | ||
|[[File:Text-field.png|250px|center]] | |style="width: 25%"|[[File:Text-field.png|250px|center]] | ||
|Text | |style="width: 25%"|Using a Text field allows a reply containing alphanumeric characters and symbols. | ||
|[[File:Number-field.png|250px|center]] | |style="width: 25%"|[[File:Number-field.png|250px|center]] | ||
|Number | |style="width: 25%"|A Number field prompts a reply in a numerical value only. | ||
|- | |- | ||
!colspan="2"| Date | !colspan="2"| Date | ||
| Line 39: | Line 43: | ||
|- | |- | ||
|[[File:Date-field.png|250px|center]] | |[[File:Date-field.png|250px|center]] | ||
|Date | |The Date default value will prompt for a single date in DD/MM/YYYY format. | ||
|[[File:Time-field.png|250px|center]] | |[[File:Time-field.png|250px|center]] | ||
| | |Allows a single time value to be entered. | ||
|- | |- | ||
!colspan="2"| DateTime | !colspan="2"| DateTime | ||
| Line 47: | Line 51: | ||
|- | |- | ||
|[[File:Datetime-field.png|250px|center]] | |[[File:Datetime-field.png|250px|center]] | ||
|Date/Time | |Date/Time field allows entry for a specific date and time | ||
|[[File:Option-field.png| | |[[File:Option-field.png|325px|center]] | ||
|Option | |Use Option to enable a single-choice from a list of pre-set values. | ||
* Enter the option name into the text field | |||
* Click Add Option+ | |||
* Make as many single-choice options as needed. | |||
* Click the Tick to save. | |||
*Use the trash can icon to delete an option if required. | |||
|- | |- | ||
!colspan="2"| MultiOption | !colspan="2"| MultiOption | ||
!colspan="2"| Flag | !colspan="2"| Flag | ||
|- | |- | ||
|[[File:Multioption-field.png| | |[[File:Multioption-field.png|325px|center]] | ||
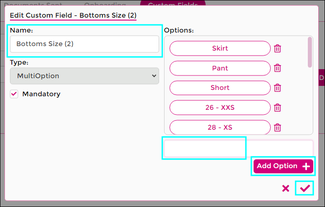
|MultiOption | |Use MultiOption to enable a multiple selections from a list of pre-set values. | ||
|[[File:Flag-field.png| | * Enter the option name into the text field | ||
|Flag | * Click Add Option+ | ||
* Make as many multiple-choice options as needed. | |||
* Click the Tick to save. | |||
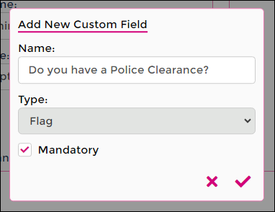
|[[File:Flag-field.png|275px|center]] | |||
|Flag field is similar to a YES/NO response. Simply tick a box for YES, leave unticked for NO. | |||
|- | |- | ||
|} | |} | ||
=Onboarding Workflow and Custom Fields= | =Onboarding Workflow and Custom Fields= | ||
<b>Stage Creation</b>: When creating your <b>[[Creating Custom Workflow|Onboarding Workflow]]</b> you can add in stages that include Custom Fields, which allows you to pick/choose at which point you would like particular responses. | |||
<b>Sending to Employee:</b> During the process of <b>[[Sending Workflow to Employee|sending your workflow]]</b> out to a staff member, your custom fields will not appear as part of the information being sent, unlike your policies and contracts. | |||
<b>Filled Out:</b> As a <b>[[Onboarding Workflow for Staff|staff member fills out]]</b> the workflow that contains Custom Fields, this will be part of the Additional Information category. | |||
You can find how each Custom Fields behave through the <b>[[Onboarding Workflow]]</b> article. | |||
=Adding Custom Fields on Staff Cards= | =Adding Custom Fields on Staff Cards= | ||
If you choose not to onboard a new employee or want to update information for an existing staff member, you can use your Custom Fields through the Additional Information tab within Staff Cards. | |||
* Click on Staff from the top menu | |||
* Click on the name of the employee to open their staff card. | |||
* Select the Additional Information tab. | |||
[[File:Add-inf-staff.png|650px]] [[File:Add-inf-field.png|675px]] | |||
* Here you will see a simple box that says Add Custom Field+ | |||
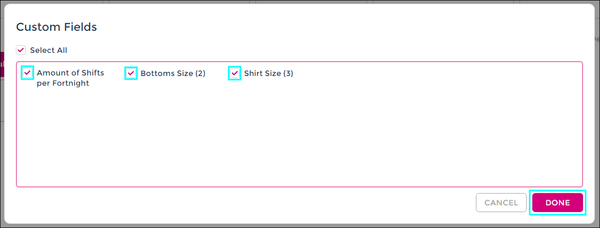
* Select the custom fields you want to add into the staff card. | |||
* Click Done to add. | |||
* These fields will now be available to fill out. | |||
* Click Done in the bottom right to save your information. | |||
[[File:Add-inf-select.png|600px]] [[File:Add-inf-choose.png|700px]] | |||
| Line 69: | Line 111: | ||
[[File:back-button.png|link= | [[File:back-button.png|link=Documents via Staff Cards]] [[File:home-button.png|link=Main Page]] [[File:next-button.png|link=Onboarding Workflow]] | ||
Latest revision as of 07:42, 14 July 2023
Using the Custom Fields section of Wageloch HR allows you to add extra fields into the Onboarding Workflow or into the Additional Information section within a staff card. This could be simple information like "Has the staff member completed orientation?" and a tick to say "yes", or even the ability to list skill sets and tick multiple options.
This article will cover each of the Custom Field types, their setup and potential uses.
Creating Custom Fields
Using custom fields within Wageloch HR unlocks a new set of information that can be entered by staff during their Onboarding process or added manually into the staff card via Additional Information.
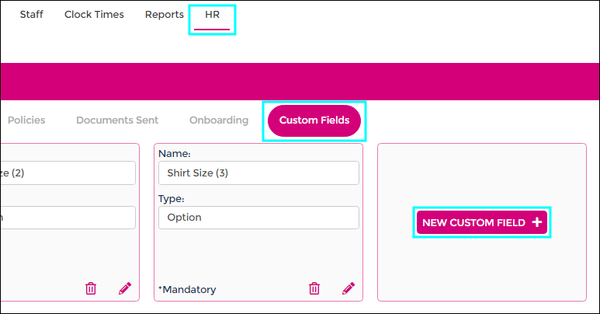
- Click HR from the top menu
- Select Custom Fields from the HR categories
- Click New Custom Field+
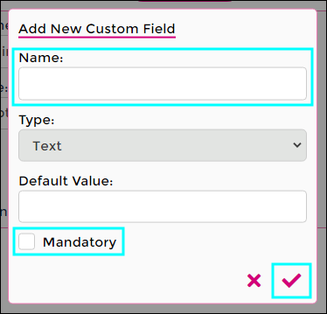
- Give the Custom Field a name
- Select the Custom Field Type (more information below)
- Select if the information is mandatory to fill out or not
- Click the tick icon to add/save.
Custom Field Types
Creating the fields themselves is easy enough, but working out the best option for what information you're seeking is a little more tricky.
Lets look at the different options for the field types and examples of what they could be used for.
Click on any of the images to see a larger screen shot.
- All custom fields must be given a Name.
- Select the Type of field you wish to create (see all variables below)
- Select whether it is a mandatory requirement to provide a response.
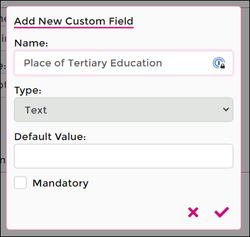
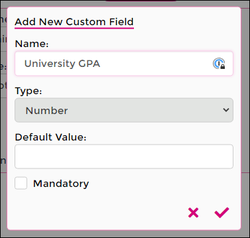
| Text | Number | ||
|---|---|---|---|
| Using a Text field allows a reply containing alphanumeric characters and symbols. | A Number field prompts a reply in a numerical value only. | ||
| Date | Time | ||
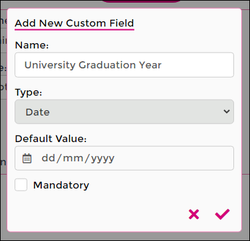
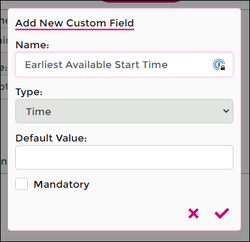
| The Date default value will prompt for a single date in DD/MM/YYYY format. | Allows a single time value to be entered. | ||
| DateTime | Option | ||
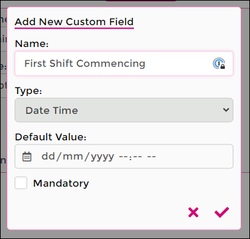
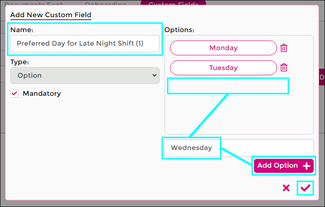
| Date/Time field allows entry for a specific date and time | Use Option to enable a single-choice from a list of pre-set values.
| ||
| MultiOption | Flag | ||
Use MultiOption to enable a multiple selections from a list of pre-set values.
|
Flag field is similar to a YES/NO response. Simply tick a box for YES, leave unticked for NO. | ||
Onboarding Workflow and Custom Fields
Stage Creation: When creating your Onboarding Workflow you can add in stages that include Custom Fields, which allows you to pick/choose at which point you would like particular responses.
Sending to Employee: During the process of sending your workflow out to a staff member, your custom fields will not appear as part of the information being sent, unlike your policies and contracts.
Filled Out: As a staff member fills out the workflow that contains Custom Fields, this will be part of the Additional Information category.
You can find how each Custom Fields behave through the Onboarding Workflow article.
Adding Custom Fields on Staff Cards
If you choose not to onboard a new employee or want to update information for an existing staff member, you can use your Custom Fields through the Additional Information tab within Staff Cards.
- Click on Staff from the top menu
- Click on the name of the employee to open their staff card.
- Select the Additional Information tab.
- Here you will see a simple box that says Add Custom Field+
- Select the custom fields you want to add into the staff card.
- Click Done to add.
- These fields will now be available to fill out.
- Click Done in the bottom right to save your information.
