Difference between revisions of "Onboarding Workflow for Staff"
| (2 intermediate revisions by the same user not shown) | |||
| Line 2: | Line 2: | ||
Alternatively, congratulations on your new team member! | Alternatively, congratulations on your new team member! | ||
In this guide we’ll be taking you through the process of how new staff | In this guide we’ll be taking you through the process of how new staff members will receive the onboarding workflow that was sent out, as per the [[Onboarding Workflow]] steps. | ||
The first part of the process is the same as our standard Onboarding process; you can view the article by [[ | The first part of the process is the same as our standard Onboarding process; you can view the article by [[Onboarding for Employers|clicking this link for managers]], or click [[Onboarding for Employees|this link]] if you're an employee. | ||
This includes Personal, Bank, Super Fund details, TFN declaration and Emergency Contacts. | This includes Personal, Bank, Super Fund details, TFN declaration and Emergency Contacts. | ||
Note: At any time, the staff member can Save their form and come back to finish it later. | <b>Note:</b> At any time, the staff member can Save their form and come back to finish it later. | ||
==First Steps== | ==First Steps== | ||
| Line 17: | Line 17: | ||
[[File:Staff-onboard-email (1).png|750px]] | [[File:Staff-onboard-email (1).png|750px]] [[File:Onboard-auth.png|460px]] | ||
==Standard Onboarding== | |||
Visit our <b>[[Onboarding for Employees]]</b> Article for more details about the Standard Onboarding process. | |||
Fill out the information in each of the following categories: | |||
* <b>Personal Details:</b> Enter Name, Date of Birth, Email, Mobile Number, Gender, Address. | |||
* <b>Bank Details:</b> Enter the name of the account holder, BSB and Account Number. | |||
* <b>Super Fund:</b> Make a selection in relation to your Superannuation account. | |||
* <b>TFN Declaration:</b> Enter your Australian Tax Office information and make relevant selections. | |||
* <b>Emergency Contacts:</b> Enter friends or family member information in the event of an emergency. | |||
Based on our custom workflow, we now have three sections left to tackle: <b>Documents to Sign, Upload Documents and Additional Information.</b> | |||
Staff are able to click Save and Edit Later if they need to source information, but want to save what they've done first. | |||
[ | [[File:Onboard-basic.png|475px]] | ||
==Documents to Sign== | ==Documents to Sign== | ||
Latest revision as of 03:37, 29 June 2023
Congratulations on your new job! Alternatively, congratulations on your new team member!
In this guide we’ll be taking you through the process of how new staff members will receive the onboarding workflow that was sent out, as per the Onboarding Workflow steps.
The first part of the process is the same as our standard Onboarding process; you can view the article by clicking this link for managers, or click this link if you're an employee.
This includes Personal, Bank, Super Fund details, TFN declaration and Emergency Contacts.
Note: At any time, the staff member can Save their form and come back to finish it later.
First Steps
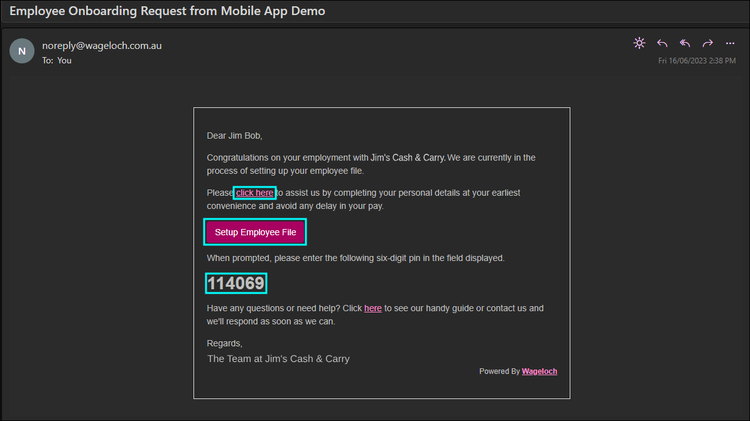
- When a staff member has been sent a request to onboard, an email will be sent shortly after.
- This email will contact a link, a button and a code.
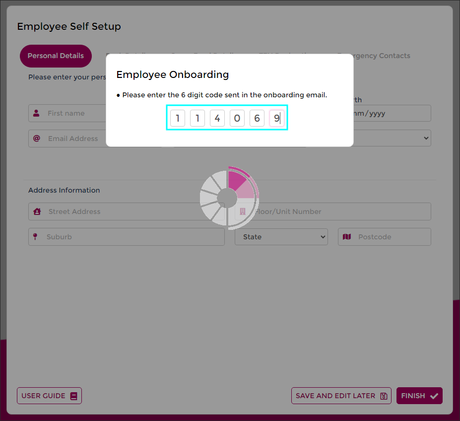
- Click the link or the button to open the form and enter the 6 digit code from the email.
- You can now access the form.
Standard Onboarding
Visit our Onboarding for Employees Article for more details about the Standard Onboarding process.
Fill out the information in each of the following categories:
- Personal Details: Enter Name, Date of Birth, Email, Mobile Number, Gender, Address.
- Bank Details: Enter the name of the account holder, BSB and Account Number.
- Super Fund: Make a selection in relation to your Superannuation account.
- TFN Declaration: Enter your Australian Tax Office information and make relevant selections.
- Emergency Contacts: Enter friends or family member information in the event of an emergency.
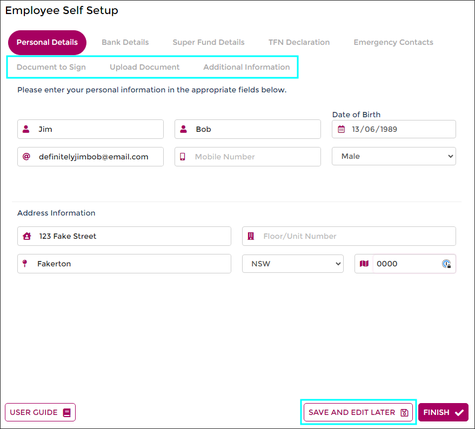
Based on our custom workflow, we now have three sections left to tackle: Documents to Sign, Upload Documents and Additional Information.
Staff are able to click Save and Edit Later if they need to source information, but want to save what they've done first.
Documents to Sign
As an example and based on our custom workflow, the employee needs to review/sign the following documents:
- Employee Agreement
- Employee Handbook (Code of Conduct)
- Position Description
Click the button for each respective Document to review and sign if prompted.
- Read and review all the information.
- Scroll to the bottom of the screen and click the Click to Sign button (if visible)
- If signing, you can draw, type or upload your signature.
- Click Sign to digitally sign your document.
- Click Submit to save.
- If successful, you’ll receive a prompt to advise your document has been signed.
- Once complete, a tick box will appear on the onboarding form next to the document.
Upload Document
If the custom onboarding workflow has requested documents to be uploaded - such as copies of licenses or certificates - you can upload these documents.
You cannot submit your onboarding form to management without completing uploads.
- Click Choose a File (or Drag/Drop the file into the window.)
- Select the file from your device.
- Click OK
- This should now successfully upload.
Additional Information
If any custom fields have been added (in this case, Uniform size/types), our employee can now make selections, enter values or add flags.
Our Custom Fields for Uniform Order (Bottoms Type/Size and Shirt Size) are now available to be selected.
- Select the Bottoms Size (2) with the type (Skirt, Pant, Short) and size.
- Select the Shirt Size (3).
Now that all of our three custom fields are completed (Documents to Sign, Upload Documents, Additional Information) and our standard onboarding is finished, we can now click Finish to send the form back to management for processing.
All done!


