Difference between revisions of "Policies"
From Wageloch Wiki
(Created page with "Adding Policy documents into Wageloch as part of your onboarding flow is extremely easy to do and is very similar to adding a [Link=Contract Templates| contract template]. Th...") |
|||
| (7 intermediate revisions by the same user not shown) | |||
| Line 8: | Line 8: | ||
* Click Upload Policy in the top right. | * Click Upload Policy in the top right. | ||
** NOTE: This will only accept PDF documents. | ** NOTE: This will only accept PDF documents. | ||
<br> | |||
[[File:upload-policy.png|1000px]] | |||
* Select your policy document by drag and drop or choosing a file. | * Select your policy document by drag and drop or choosing a file. | ||
* <b>File Name: </b> Allows you to change the name of the policy. | * <b>File Name: </b> Allows you to change the name of the policy. | ||
| Line 14: | Line 17: | ||
* Click Done to save your policy template. | * Click Done to save your policy template. | ||
[[File: policy-upload-placeholder.png]] | [[File: policy-upload-placeholder.png|1000px]] | ||
==Issuing Policies== | ==Issuing Policies== | ||
| Line 23: | Line 25: | ||
* On the left side, click the Page/Pencil Icon to <b>Issue Policy to Employee</b> | * On the left side, click the Page/Pencil Icon to <b>Issue Policy to Employee</b> | ||
** TIP: If you hover over the icons it will show a tool tip with the action. | ** TIP: If you hover over the icons it will show a tool tip with the action. | ||
<br> | |||
[[File:issue-policy.png]] | |||
<br> | |||
* <b>Title: </b> Name of the file | * <b>Title: </b> Name of the file | ||
* <b>Employee: </b> Select the name of the staff member you wish to send this to | * <b>Employee: </b> Select the name of the staff member you wish to send this to | ||
| Line 28: | Line 33: | ||
* If you added a Countersign field on the template, you’ll be prompted to enter the details of who will be countersigning this policy. | * If you added a Countersign field on the template, you’ll be prompted to enter the details of who will be countersigning this policy. | ||
* Click Yes to send to both the employee and countersign. | * Click Yes to send to both the employee and countersign. | ||
<br> | |||
[[File: issue-policy-send.png]] | [[File: issue-policy-send.png|1000px]] | ||
==Edit Policy Template== | ==Edit Policy Template== | ||
To edit any placeholders or information within a policy template, click the pencil icon on the far left. | To edit any placeholders or information within a policy template, click the pencil icon on the far left. | ||
This will allow you to add, move and remove placeholders, rename the document title, or even upload a new document template if required. | This will allow you to add, move and remove placeholders, rename the document title, or even upload a new document template if required. | ||
<br> | |||
[[File:edit-policy.png]] | |||
==Delete Policy Template== | ==Delete Policy Template== | ||
* To delete a policy template, click the bin icon. | |||
* Confirm the deletion prompt. | |||
<br> | |||
Even if you delete or edit a policy template, the document will still remain as-is on an employee staff card. | |||
<br> | |||
[[File:delete-policy.png]] | [[File:delete-policy.png]] | ||
[[File:back-button.png|link=Contract Templates ]] [[File:home-button.png|link=Main Page]] [[File:next-button.png|link=Documents Sent]] | |||
Latest revision as of 01:50, 23 June 2023
Adding Policy documents into Wageloch as part of your onboarding flow is extremely easy to do and is very similar to adding a [Link=Contract Templates| contract template].
The file type import is again limited to PDF files with the policy template having minimal default placeholders available, with only Employee Signature and Supervisor Countersign available.
Upload Policy Template
- Select HR from the top menu
- Select the Policies tab.
- Click Upload Policy in the top right.
- NOTE: This will only accept PDF documents.
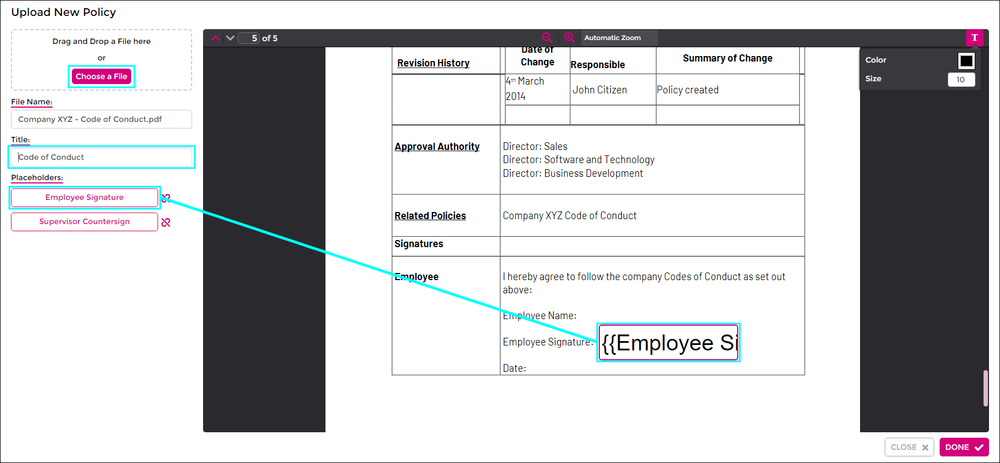
- Select your policy document by drag and drop or choosing a file.
- File Name: Allows you to change the name of the policy.
- Title: Give the policy a title.
- Placeholders: Using the preview window on the right, left-click and drag the placeholder names into the window, placing them where that piece of data will populate.
- Click Done to save your policy template.
Issuing Policies
- Open the HR Module
- Click the Policies tab.
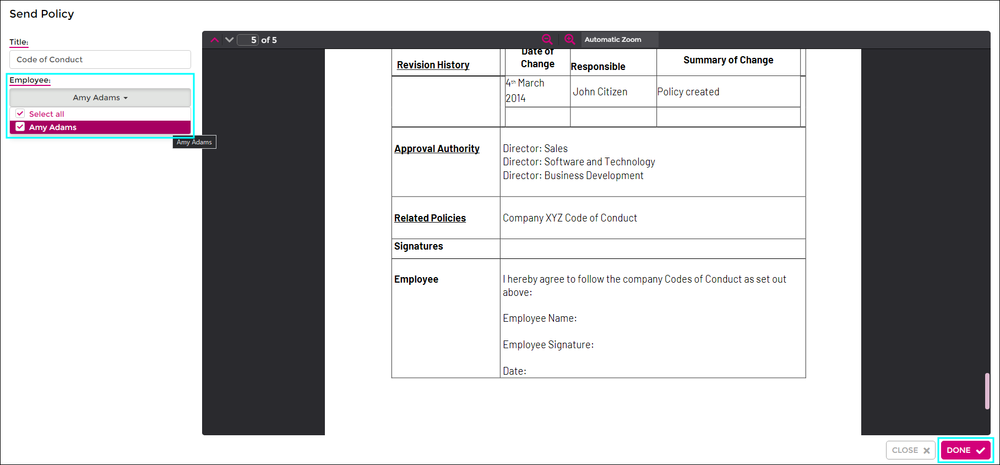
- On the left side, click the Page/Pencil Icon to Issue Policy to Employee
- TIP: If you hover over the icons it will show a tool tip with the action.
- Title: Name of the file
- Employee: Select the name of the staff member you wish to send this to
- Place holders: Fill out each of the placeholders and click Done.
- If you added a Countersign field on the template, you’ll be prompted to enter the details of who will be countersigning this policy.
- Click Yes to send to both the employee and countersign.
Edit Policy Template
To edit any placeholders or information within a policy template, click the pencil icon on the far left.
This will allow you to add, move and remove placeholders, rename the document title, or even upload a new document template if required.
Delete Policy Template
- To delete a policy template, click the bin icon.
- Confirm the deletion prompt.
Even if you delete or edit a policy template, the document will still remain as-is on an employee staff card.


