MYOB Acumatica and Wageloch Onboarding
From Wageloch Wiki
(Redirected from MYOB Advanced and Wageloch Onboarding)
If you use MYOB Acumatica and are considering using Wageloch's onboarding tool, there is a very specific setup that needs to be completed.
This process outlines creating the end points in MYOB Acumatica that will help employee's onboarding information transfer freely between Wageloch and MYOB Acumatica.
Create Initial Endpoint
- Log into MYOB Acumatica.
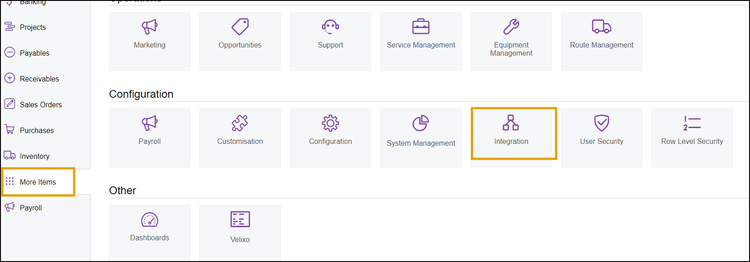
- Select More Items from the left menu and click Integrations.
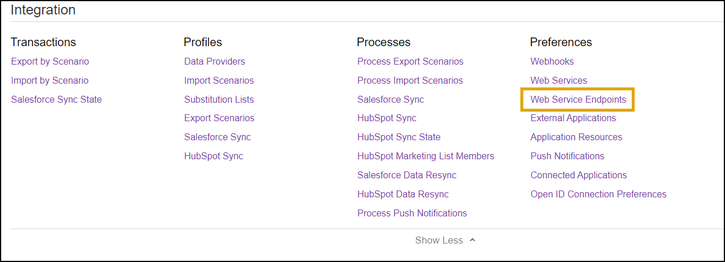
- In the Preferences category, select Web Service Endpoints.
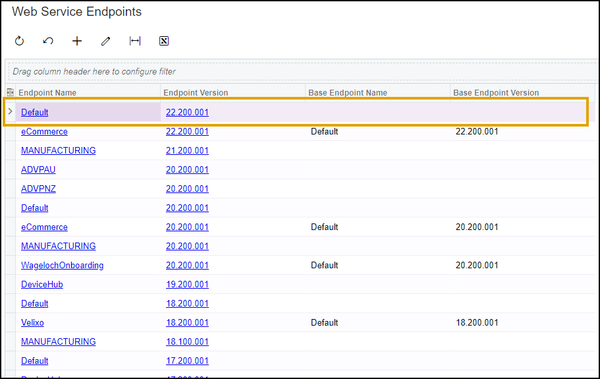
- Select the Default endpoint name (top of the list).
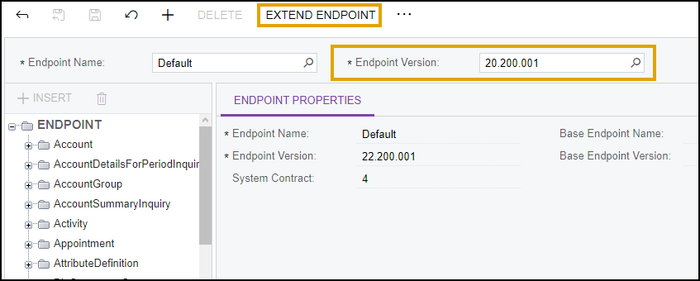
- When opened, confirm that the Endpoint Version is showing as 20.200.001. or update it.
- Above the Endpoint Name field, click Extend Endpoint.
- NOTE: If not visible, click "..." and it should appear.
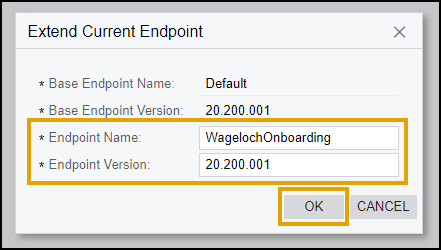
- A box will appear for Extend Current Endpoint; some fields cannot be edited.
- Base Endpoint Name: Default
- Base Endpoint Version: 20.200.001
- Endpoint Name: WagelochOnboarding (must be exact!)
- Endpoint Version: 20.200.001
- Click OK to finish
Creating Endpoints under the "WagelochOnboarding" Endpoint
In the Web Service Endpoints screen, select the newly created endpoint WagelochOnboarding
The endpoints we need to create are:
- EmployeeClasses
- VelixoBranches
- Departments
- Calendar
- Positions
- VelixoExpenseAccounts
- VelixoExpenseSubAccounts
- CashAccounts
- PayGroups
When creating the above endpoints, we'll be presented with a Create Entity box; the Object Name and the above endpoint names need to match.
EmployeeClasses Endpoint
- Select the ENDPOINT heading in the list
- Click the +INSERT button above.
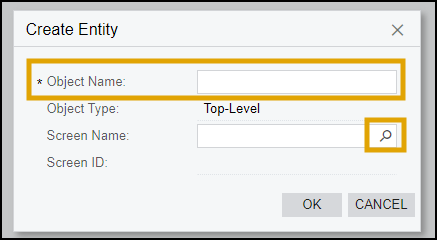
- You'll now see the Create Entity box.
- Type EmployeeClasses into the Object Name
- Click the magnifying glass next to Screen Name.
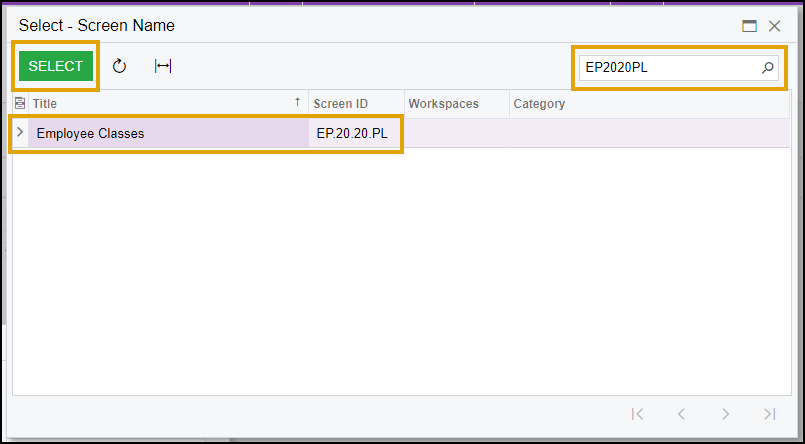
- Type EP2020PL into the Search box up the top right.
- Double click EmployeeClasses with the Screen ID: EP.20.20.PL or use the Select button.
- Wait for ScreenID to populate and click OK to get back to your endpoint menu.
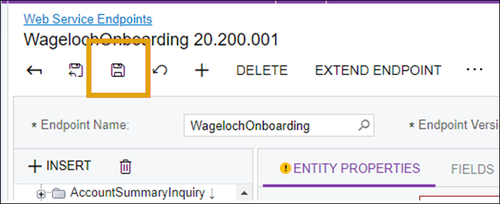
- Ensure you hit the Save icon up the top of the screen after every Endpoint creation to prevent loss of data.
VelixoBranches Endpoint
- Select the ENDPOINT heading in the list
- Click the +INSERT button above.
- You'll now see the Create Entity box.
- Type VelixoBranches into the Object Name
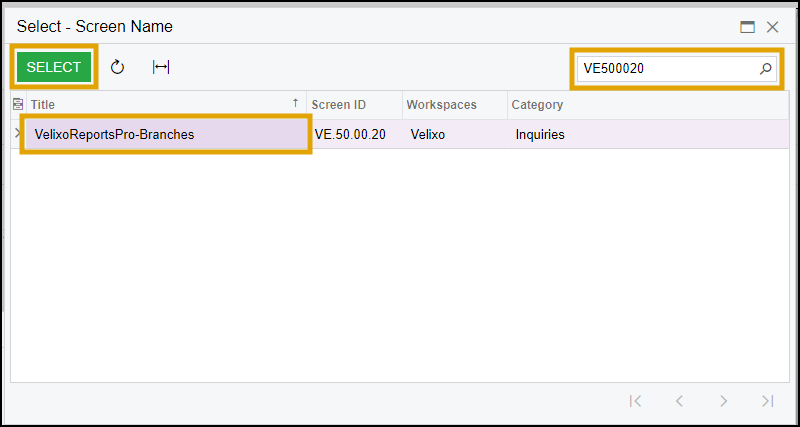
- Click the magnifying glass next to Screen Name.
- Type VE500020 into the Search box up the top right.
- Double click VelixoReportsPro-Branches with the Screen ID: VE.50.00.20 or use the Select button.
- Wait for ScreenID to populate and click OK to get back to your endpoint menu.
- Ensure you hit the Save icon up the top of the screen after every Endpoint creation to prevent loss of data.
Departments Endpoint
- Select the ENDPOINT heading in the list
- Click the +INSERT button above.
- You'll now see the Create Entity box.
- Type Departments into the Object Name
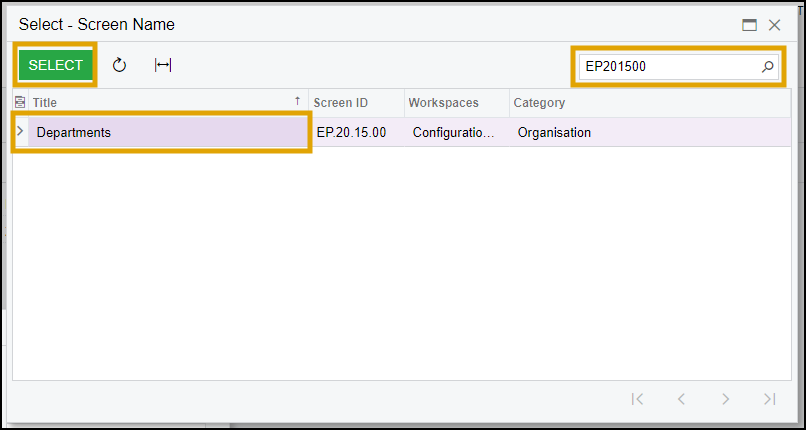
- Click the magnifying glass next to Screen Name.
- Type EP201500 into the Search box up the top right.
- Double click Departments with the Screen ID: EP.20.15.00 or use the Select button.
- Wait for ScreenID to populate and click OK to get back to your endpoint menu.
- Select Departments Endpoint in the list
- Up the top under Fields click Populate
- Click the magnifying class next to Object
- Double click EPDepartment
- Click SELECT ALL then click OK
- Ensure you hit the Save icon up the top of the screen after every Endpoint creation to prevent loss of data.
Calendar Endpoint
- Select the ENDPOINT heading in the list
- Click the +INSERT button above.
- You'll now see the Create Entity box.
- Type Calendar into the Object Name
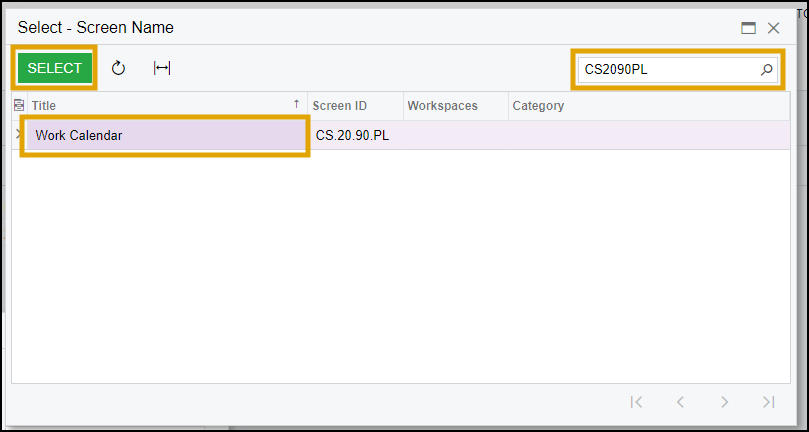
- Click the magnifying glass next to Screen Name.
- Type CS2090PL into the Search box up the top right.
- Double click Work Calendar with the Screen ID: EP.20.90.PL or use the Select button.
- Wait for ScreenID to populate and click OK to get back to your endpoint menu.
- Ensure you hit the Save icon up the top of the screen after every Endpoint creation to prevent loss of data.
Positions Endpoint
- Select the ENDPOINT heading in the list
- Click the +INSERT button above.
- You'll now see the Create Entity box.
- Type EmployeeClasses into the Object Name
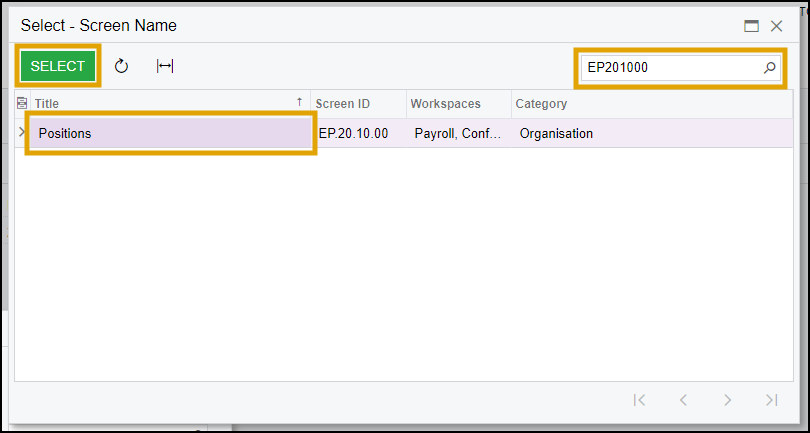
- Click the magnifying glass next to Screen Name.
- Type EP201000 into the Search box up the top right.
- Double click Positions with the Screen ID: EP.20.10.00 or use the Select button.
- Wait for ScreenID to populate and click OK to get back to your endpoint menu.
- Select Positions Endpoint in the list
- Up the top under Fields click Populate
- Click the magnifying class next to Object
- Double click EPPosition and click SELECT
- Click SELECT ALL then click OK
- Ensure you hit the Save icon up the top of the screen after every Endpoint creation to prevent loss of data.
VelixoExpenseAccounts Endpoint
- Select the ENDPOINT heading in the list
- Click the +INSERT button above.
- You'll now see the Create Entity box.
- Type VelixoExpenseAccounts into the Object Name
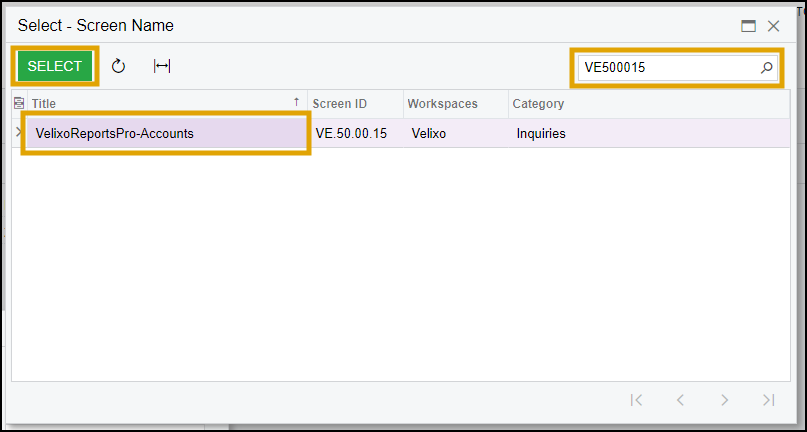
- Click the magnifying glass next to Screen Name.
- Type VE500015 into the Search box up the top right.
- Double click VelixoReportsPro-Accounts with the Screen ID: VE.50.00.15 or use the Select button.
- Wait for ScreenID to populate and click OK to get back to your endpoint menu.
- Ensure you hit the Save icon up the top of the screen after every Endpoint creation to prevent loss of data.
VelixoExpenseSubAccounts Endpoint
- Select the ENDPOINT heading in the list
- Click the +INSERT button above.
- You'll now see the Create Entity box.
- Type VelixoExpenseSubAccounts into the Object Name
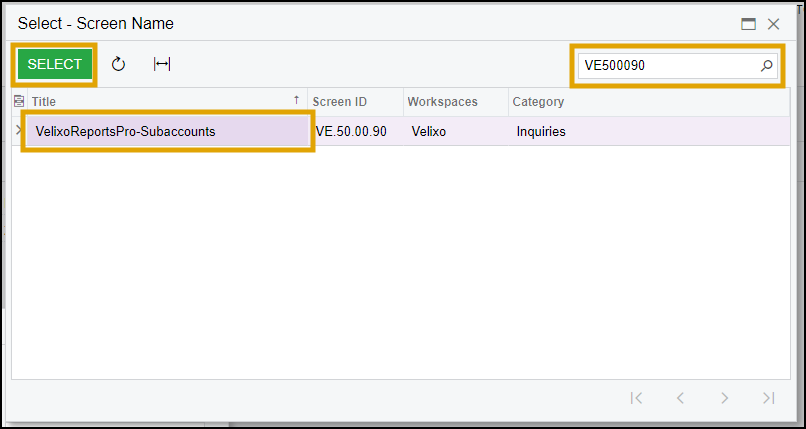
- Click the magnifying glass next to Screen Name.
- Type VE500090 into the Search box up the top right.
- Double click VelixoExpenseSubAccounts with the Screen ID: VE.50.00.90 or use the Select button.
- Wait for ScreenID to populate and click OK to get back to your endpoint menu.
- Ensure you hit the Save icon up the top of the screen after every Endpoint creation to prevent loss of data.
CashAccounts Endpoint
- Select the ENDPOINT heading in the list
- Click the +INSERT button above.
- You'll now see the Create Entity box.
- Type CashAccounts into the Object Name
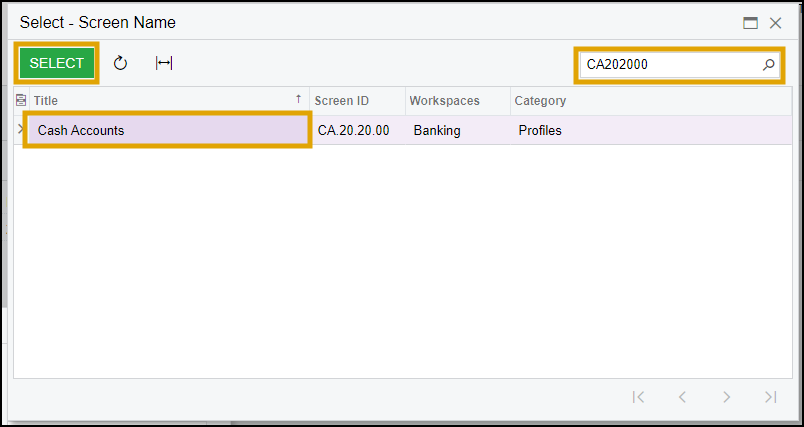
- Click the magnifying glass next to Screen Name.
- Type CA202000 into the Search box up the top right.
- Double click CashAccounts with the Screen ID: CA.20.20.00 or use the Select button.
- Wait for ScreenID to populate and click OK to get back to your endpoint menu.
- Select Cash Accounts Endpoint in the list
- Up the top under Fields click Populate
- Click the magnifying class next to Object
- Select Cash Account Summary
- Click SELECT ALL then click OK
- Ensure you hit the Save icon up the top of the screen after every Endpoint creation to prevent loss of data.
PayGroups Endpoint
- Select the ENDPOINT heading in the list
- Click the +INSERT button above.
- You'll now see the Create Entity box.
- Type PayGroups into the Object Name
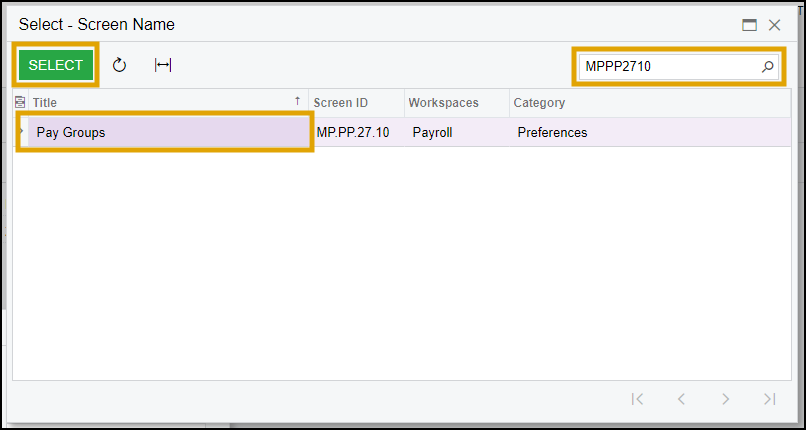
- Click the magnifying glass next to Screen Name.
- Type MPPP2710 into the Search box up the top right.
- Double click PayGroups with the Screen ID: MP.PP.27.10 or use the Select button.
- Wait for ScreenID to populate and click OK to get back to your endpoint menu.
- Select PayGroups Endpoint in the list
- Up the top under Fields click Populate
- Click the magnifying class next to Object
- Select PayGroups
- Click SELECT ALL then click OK
- Ensure you hit the Save icon up the top of the screen after every Endpoint creation to prevent loss of data.
